Easy No-Sew Face Mask Hack: Adjustable Elastic Ear Loops
Make an adjustable elastic ear loop on a reusable fabric face mask video tutorial.
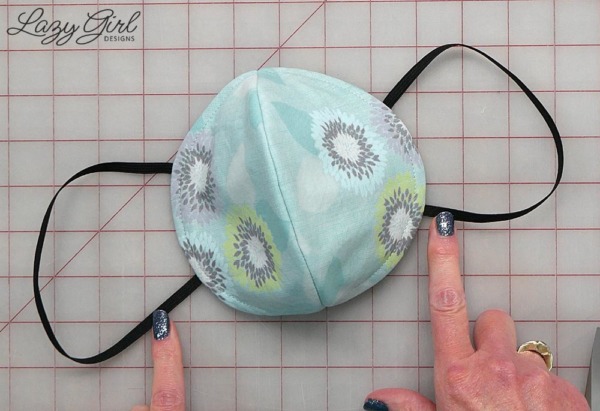
Lazies, Face masks are here to stay for a while but the elastic ear loops start to hurt the back of the ear after a short time. I like the ease of using the elastic ear loops and the adjustability of ties for a comfortable fit. See how to combine the best of both with my easy trick to make adjustable elastic ear loops on a face mask. Better yet, use the same trick to replace worn-out loops with new elastic or ties. All you need are some basic desk items. Watch the video tutorial, then grab your FREE printable tutorial (valued at $9.95) below!

NOTE: Lazy Girl Designs makes no claims regarding the effectiveness or function of these ideas/techniques or mask designs.
Inspiration for Adjustable Ear Loop on a Face Mask
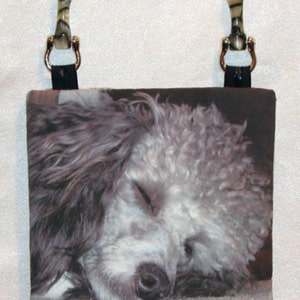
Inspiration is everywhere. And when you pick up tips and tricks like the adjustable shoulder strap on my Lexi Carryall purse pattern LGD147, you build skills that can be used on other projects.
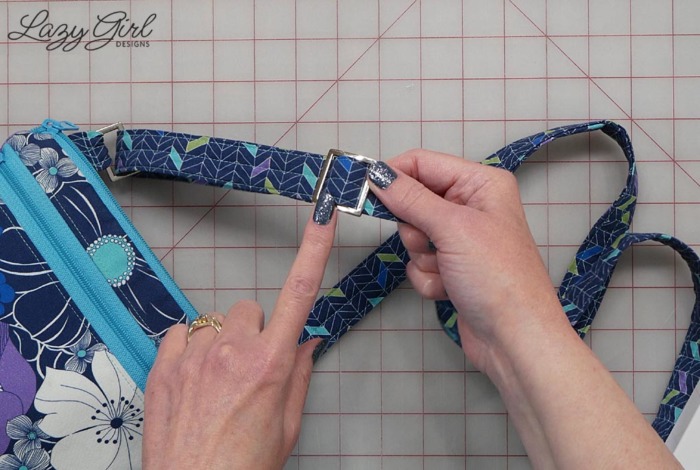
Use the skills you learn in my patterns for other projects. The adjustable strap on the Lexi Carryall LGD147 purse pattern was the inspiration for my face mask hack. If a shoulder strap can be adjustable, why not a face mask?
[mv_video key=”dtldoyfhyu6mawhucegk” volume=”80″ aspectRatio=”true” title=”No-Sew Adjustable Elastic Ear Loop on Face Mask” thumbnail=”https://mediavine-res.cloudinary.com/v1586614747/fzzp2hqynhftenugio7x.jpg” jsonLd=”true” doNotOptimizePlacement=”false” doNotAutoplayNorOptimizePlacement=”false” sticky=”false”]The Face Mask Design
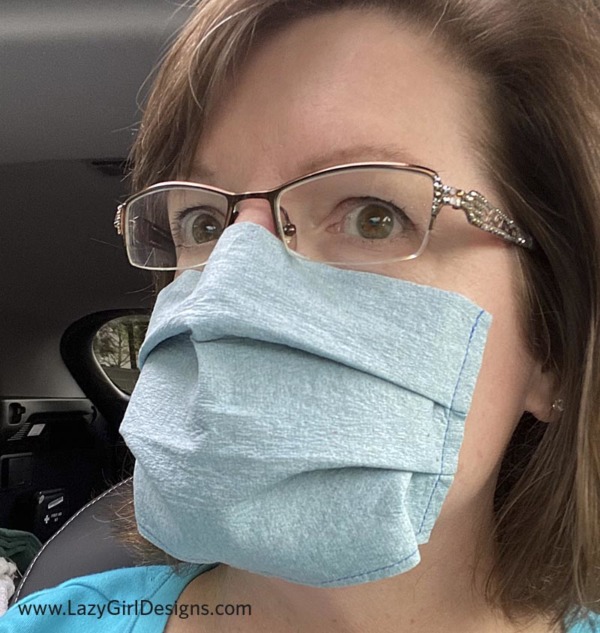
I like this basic face mask design because it’s generally a good fit for a variety of face sizes and shapes. Both my husband and I are happy with how the edge of the mask fits close to our face all the way around the mask. You can see how it fits my face in the video in this post.
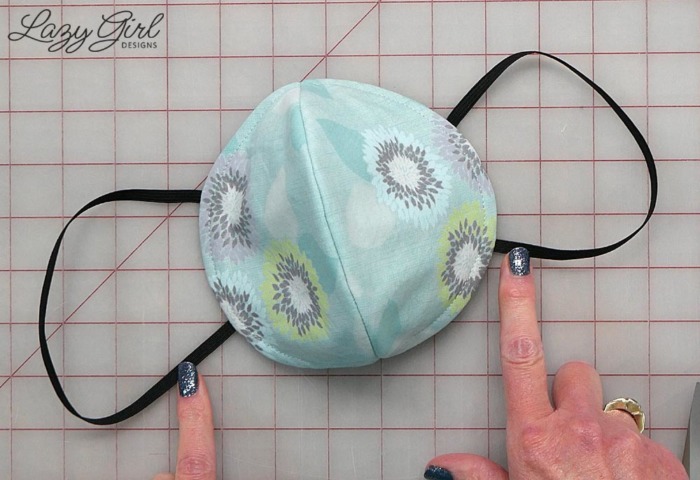
This simple face mask design is quick and easy to make.
Considerations and Options
Watch the video tutorial to see how to use this easy no-sew fix on existing masks. Then use the technique to customize or replace loops. Simply cut away the elastic and attach ties using my technique. You can also convert the ear loop to a head loop. Just attach a longer piece of elastic at the top, going around the back of the head, and another at the bottom.
I’m making these masks for the loved ones in my life and for donations since I don’t know the size needed. This is especially handy for fitting face masks on children.
Note: This post contains affiliate links. I may make a commission at no additional cost to you when you order items through those links.
Supplies Needed To Adjust Ear Loop on Face Mask
You’ll find everything you need for this project on your desk.
- Pair of sharp scissors I love these by Kai Scissors
- A scrap of paper
- A good stapler I like this Poppin Stapler
NOTE: Use this technique on any style mask. If the mask is only one or two layers of fabric, add scraps of fabric in the stapled area for a tighter result.
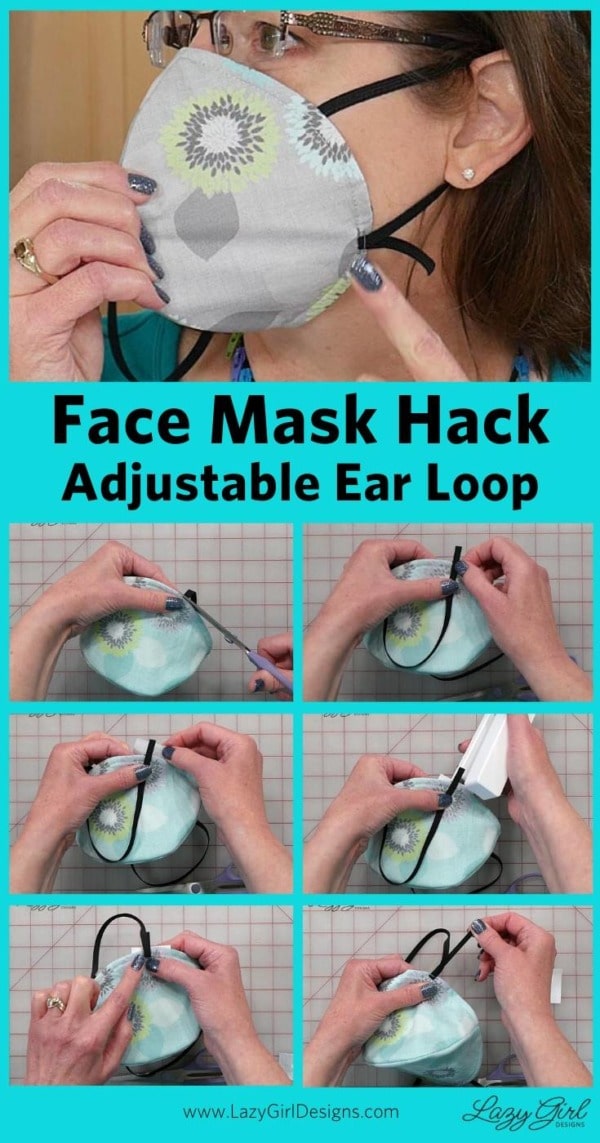
How To Make Adjustable Elastic Ear Loops on a Face Mask
When making a new mask or replacing elastic, cut the elastic longer than needed. For this demonstration, I’m using an existing mask and making the ear loops adjustable. Don’t miss my top choices for face mask patterns later in this post. Then grab your FREE printable tutorial (valued at $9.95) below!
1. Cut one end of the ear loop at the edge of the face mask.
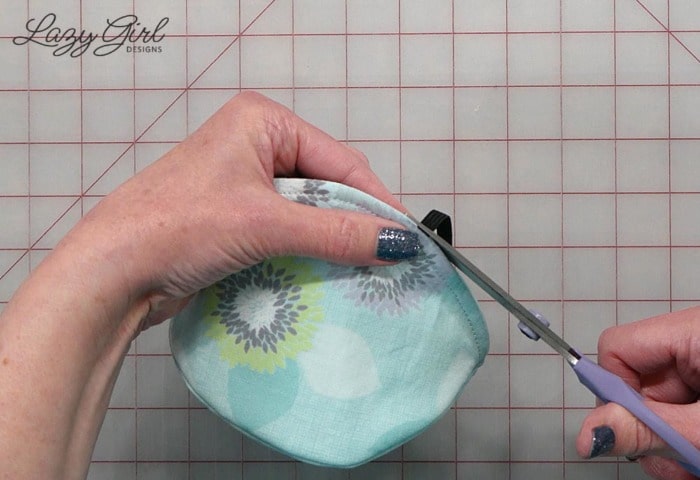
Cut the elastic close to the edge of the mask
2. Position the end of the elastic past the edge of the mask. Place a scrap of paper behind the face mask for support.
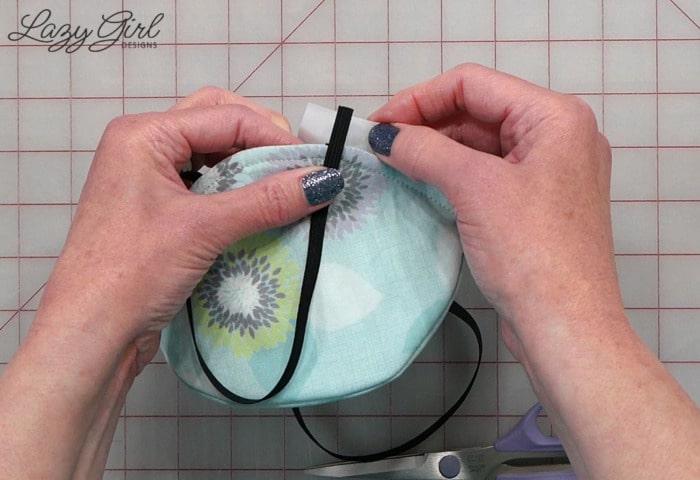
Position the end of the elastic past the edge of the mask. Place a scrap of paper behind the face mask for support.
3. Center a stapler over the elastic and staple through all layers. Be sure not to staple through the elastic.
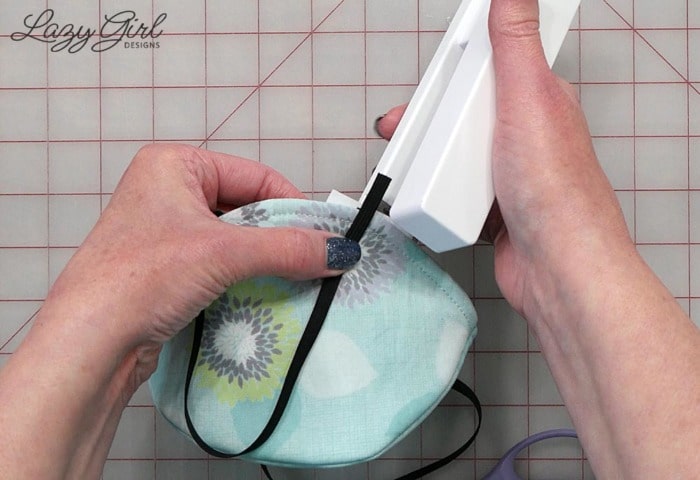
Stapler over the elastic, through all layers. Be sure not to staple through the elastic.
4. Fold elastic away from the mask and align with the cut end. Staple again between the first staple and the edge of the mask. Be sure not to staple through the elastic.
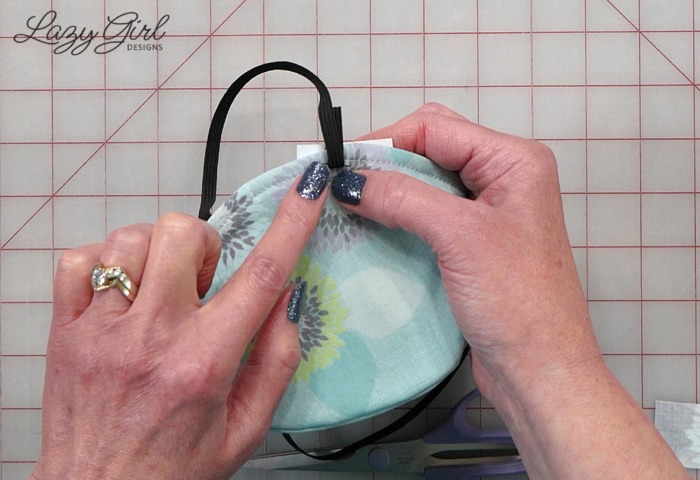
Fold elastic away from the mask and staple again between the first staple and the edge of the mask.
5. To test, pull on the cut end of elastic to make sure the elastic slides through the staples and there is enough resistance to hold the elastic in place once adjusted. Remove staples and redo if necessary to get good resistance and a proper fit.
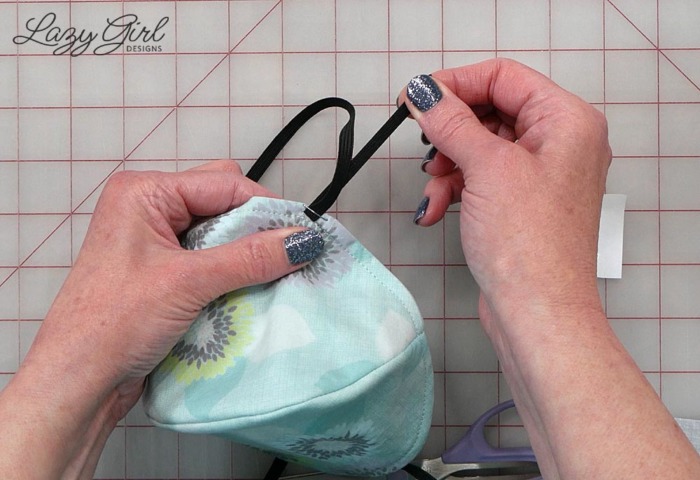
Test: Pull on the cut end of elastic to make sure there is enough resistance to hold the elastic in place once adjusted. Remove staples and redo if necessary.
How To Use The Adjustable Strap
Put the mask on and adjust to fit. Pull the cut end of the elastic along the side of your face toward your ear. Do not pull away from your cheek since that may pull the staples from the mask.
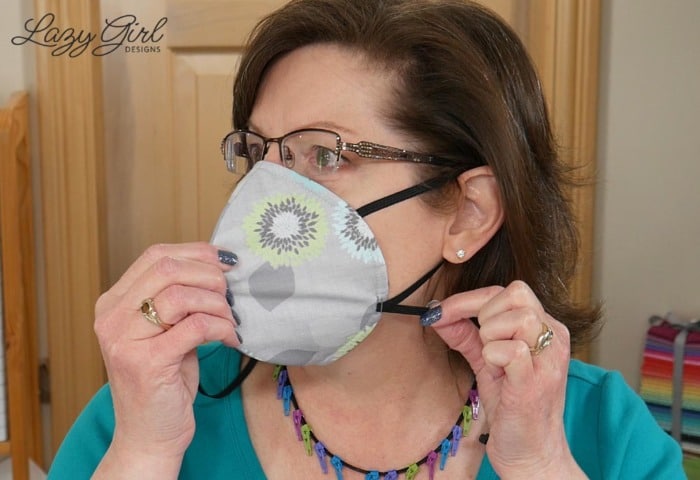
Put the mask on and adjust to fit. Pull the cut end of the elastic along the side of your face toward your ear. Do not pull away from your cheek since that may pull the staples from the mask.
How to Clean A Face Mask
I have washed this mask with the staples and the staples did not come out or get caught on anything. Use your best judgment as to whether to wash a mask with staples in your washing machine. As an option, remove the staples before washing. It’s easy enough to re-staple after cleaning.
No-Strap Disposable Face Mask for Haircuts and More
Also see my No-Strap Face Mask video tutorial to make a mask to use for your next haircut.
The mask design shown in the video can be found here: Phoebe Health Face Mask Pattern
Need interfacing for your project? Our best-selling Face-It Soft is 100% cotton lightweight woven fusible.
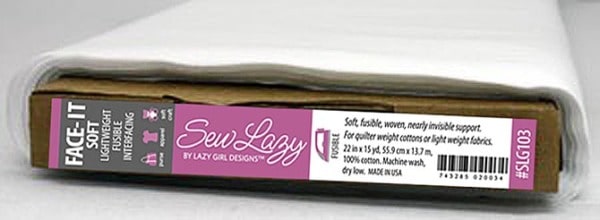
Comparable to Pellon Shape Flex SF101.
My Top Choices for Free Face Mask Patterns
I’ve tried about a dozen face mask patterns and there are three that I like quite a bit for fit and comfort.
Face Mask, quick, easy, above average fit, by Tom Bihn– Really good fit might be due to bias cut/edges, stretching where needed as it meets the face.
Face Mask with ties, to fit over N95 mask, A.B. Mask by a Nurse– I’ve made dozens of these with elastic ear loops cut to 6.5?. Eliminate ties by sewing right sides together, leave an opening to turn. Then pleat and topstitch to finish.
Face Mask, easy and quick, Phoebe Health – Leaf shape pieces create round mask for comfortable fit agaisnt face. Shown in the video tutorial link above.
Face Mask, basic surgical mask style rectangle w pleats, elastic ear loops, Deaconess
Check out our resource page for the free hospital gown pattern and links to patterns for a face mask, isolation gown, and scrub cap.
For elastic ear loops, I use 1/4″ Wide Elastic
The black elastic shown in this demo is latex-free, and I have to say, it is so much softer and more comfortable than regular elastic. My goodness, what a difference. The stuff I bought is out of stock as of this writing.
I also found 1/8″ wide elastic difficult to hold in place while sewing. It wasn’t substantial enough to have good structure or body and stay in place while sewing.
Follow my Pinterest board for Face Surgical Masks, Scrub Caps, Hospital Gowns for quick links to projects I like.
That’s Pinterest-ing!
Follow me on Pinterest and pin this post to your Pinterest boards.
Subscribe to receive emails for my blog and newsletters about new patterns and project ideas.
Enjoy!
Joan
Joan’s Sewing Group | Pinterest
Like and share this post with your stitchy friends.


Can not watch the video..it is very broken up can not make out what you are doing
The link for the elastic in your post is for TOP braided elastic cord, composed of polyester and natural latex rubber. Is that what you used?
Thank you.
Sue I have a couple of different elastics on hand. I do use that elastic as well as the latex-free elastic I found on Amazon. However, Amazon was out of the latex-free when I checked.
Love your zipper tab necklace
Hi Diane, Thanks so much! I made that zipper necklace. Thanks for commenting.
You have a great pattern, however as a former critical care RN for many years, I find that elastic behind my ears caused pressure areas that got inflamed. Additionally, elastic will not handle multiple washings on a high temperature. I would suggest 2 fabric ties: one for the neck area and one that ties higher up on the back of the head.
Would very much like the video on adjustable elastic for around ears. Couldn’t
find it anywhere on your site. My email address is. slimfeather@verizon.net
Thank you so much.
Hi Shirley! Thanks for asking. The adjustable elastic ear loop video showing my trick is in this blog post. If you don’t see the video right away, give the post time to load on your computer or mobile device. https://www.lazygirldesigns.com/face-mask-adjustable-ellastic-ear-loops/
Would it rust if you wash it in washer/dryer?
Nancy Mine did not rust after a couple of washings. If concerned, remove the staples and re-staple as needed.
Thank you for this wonderful tutorial! I just bought an artisan mask but of course I couldn’t/didn’t want to try it on at the shop. When I brought it home and tried it on, I was so bummed to find out the ear loops are way too long. This is exactly the type of no-sew solution I was looking for! Your video is clear and detailed and very helpful. Best wishes to you!
I have order the interfacing. I also need Sew Lazy sew in stiff stuff firm. How can I order this item , Thanks.
Nancy Wildzunas
You are amazing!! This face mask hack for adjustable ear elastic is absolutely wonderful! I’m an old medically retired OR nurse and have been struggling with masks/patterns/fit/filtration capability. Am just making masks for family at this point but believe like many others they are here to stay for at least awhile and maybe intermittently forever. Hope you get this message as I am not a big fan/participant in social media and am electronically challenged as well. Thank you so much for sharing!
Thank you, Joan, for sharing this technique! It worked great on masks I purchased that were too loose.
Lazy Girl Designs Rocks!!
Love the Hack! Just curious about the mask you’re wearing. I assume it is the “Phoebe Health” mask. Made one using the downloaded pattern, way too big. How did you adjust for size on your mask. I like the fit. Much better fit than some other patterns I’ve tried. Thanks
That was Hands down the most Amazing thing I have seen!!! I keep remaking masks for my kids and EVERY single website has different measurement so there’s a lot of waste. Thanks so much. I also have taken your Craftsy class and soooo glad they have come to their senses and came back under their original name.
I was so excited when I saw your idea! I just changed it to a zigzag stitch and now all my masks are adjustable at the top! Thank you so much! I have been using the 1/8 th inch elastic! Everyone appreciates the adjustable straps!
Inventive concept but those staple ends against the face could scratch skin or worse an eye while wearing or putting it on. Dangerous for kids. Good idea if something besides a staple could be used.
Joan here: see my reply below.
Hi Luliejay, I address the issue of the staple ends in the tutorial. Make sure they point in toward the mask. Additionally, staple the elastic to the other side so the ends are on the outside of the mask.