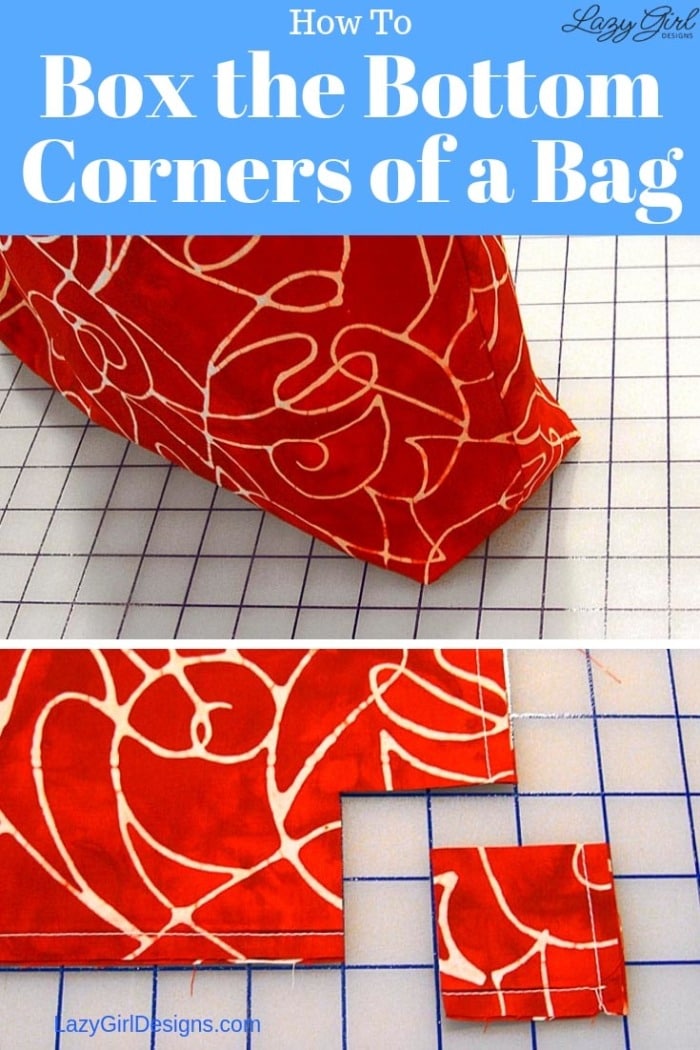
How to Make Perfect Box Bottom Corners on a Bag Every Time
Easily box the bottom corners on every bag you make with this step-by-step free sewing tutorial.
Lazies, Easily and accurately box the bottom corners of your next bag creation with my step-by-step sewing tutorial. A box bottom means the bag has a flat bottom, making it easier to hold wide things or rest comfortably when you set it down. This is an easy technique to use on lots of designs. I incorporate this technique in a number of my Lazy Girl Designs sewing patterns, too. Be sure to grab a FREE (a $9.95 value) printable tutorial below.
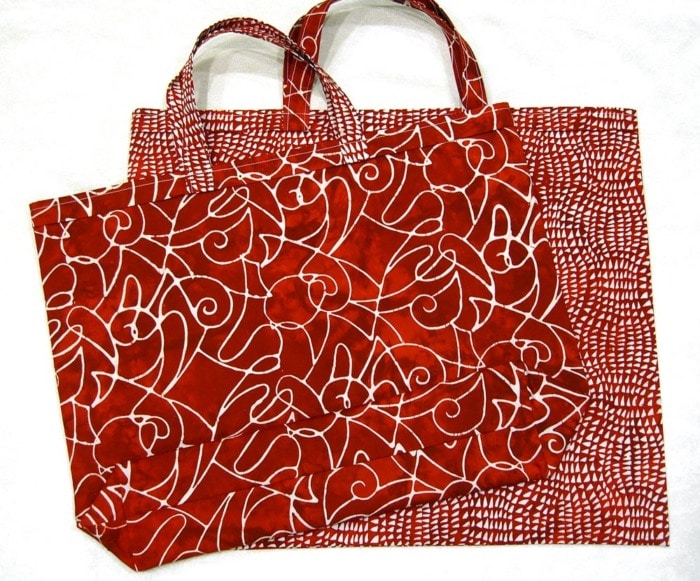
 Lazy Girl Designs ‘With Love Tote’ with a 4″ deep boxed bottom.
Box Any Tote Bag or Purse Pattern Project
This tutorial uses our free With Love Tote bag pattern. Here are two totes showing boxed corners on the top tote and a flat tote on the bottom. You can grab the FREE Tote Bag pattern here.
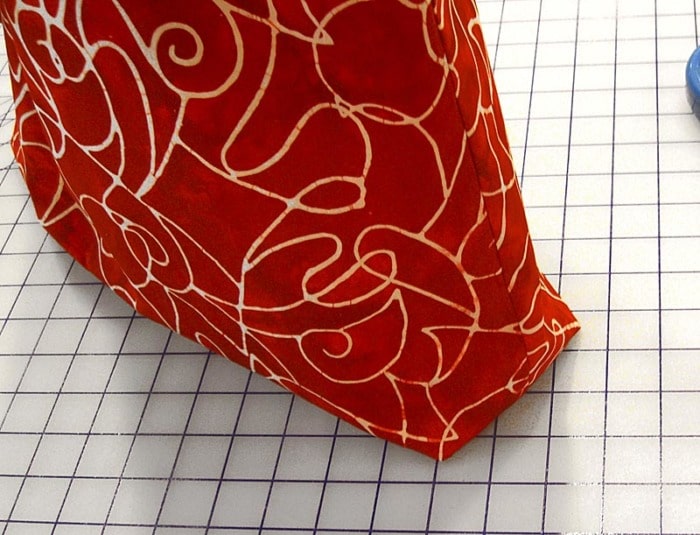
Here’s a close-up view of the boxed corner from the image above. The side seam (left) and bottom seam (right) meet and a seam is stitched across these seams to give the bag dimension.
How Boxing the Bottom Corners Affects the Bag Size
Boxing the bottom corners to give a bag a flat bottom to stand on ‘steals’ from the width and height, changing the size of the finished bag. The result will be a bag that is narrower across the width of the bag at the bottom seam, and shorter in height along the side seam from top to bottom.
- Bag size before boxing corners: 19″ W x 16″ H (flat bag has zero depth)
- Bag size after boxing corners: 15″ W x 14″ H x 4″ D
- Width is the length of the remaining seam across the bag bottom: 19″ – 4″ = 15″
- Height is the length of the remaining side seam: 16″ – 2″ = 14″
- Depth of the bag is the length of the boxed corner seam: 4″
1. Determine Desired Size of the Boxed Corner
Small changes in the size of the corner cuts make a big difference in the finished size of the project. If you are unsure of how big to cut a square to box the bottom corners to give your bag depth, start with a smaller cut, sew, then see what you think. You can always cut more off and stitch again.
- Our tutorial shows a 4″ deep boxed corner.
- Divide the desired 4″ depth by 2 = 2″
- 2″ is the size of the square that will be cut off of both bottom corners.
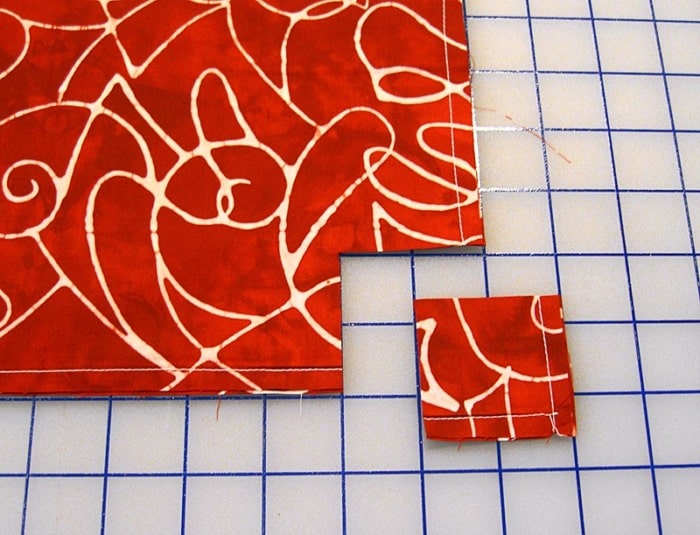
2. Mark and Cut Squares From The Bag Corners
- Flatten project and align it with the grid on a cutting mat.
- Mark a 2″ square on both bottom corners.
- Cut the marked square from each bottom corner.
For more free sewing tutorials, follow my Pinterest board Free Sewing Tutorials, Tips & Hacks
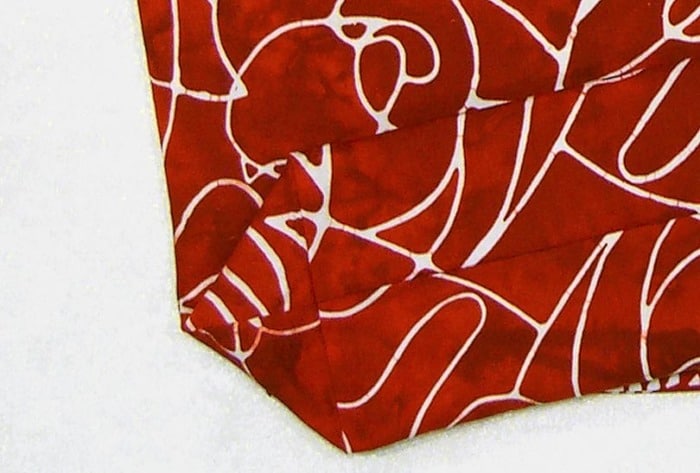
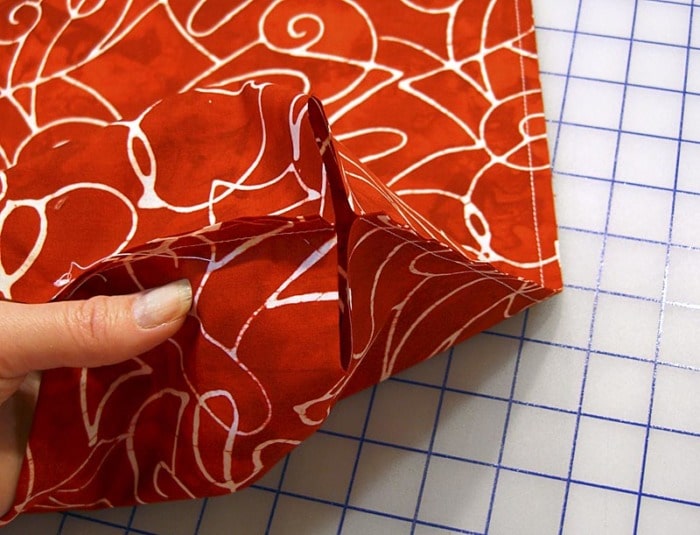
3. Open and Align Seams of the Bag at the Cut Corners
- Reach into the corner and open.
- Bring the side and bottom seams together, matching the seams.
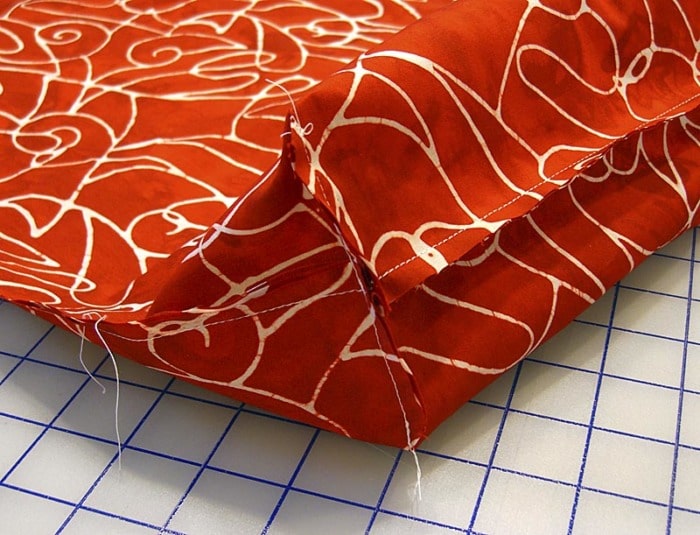
4. Stitch Closed to Box the Bottom Corners
- Stitch through all layers along the cut edge to close the corner.
- Backstitch at the beginning, where the seams match, and at the end.
- If desired, reinforce by stitching again for extra strength.
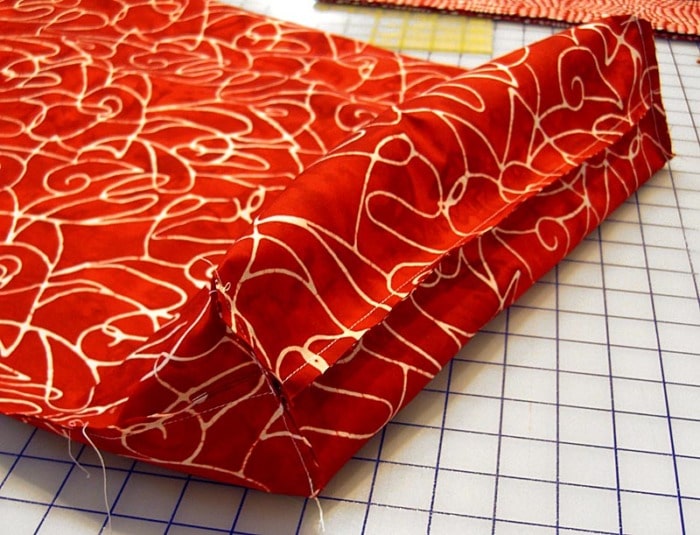
5. Finishing Details
Here’s a full view of the seams at the bottom of the bag after boxing the corners. Remember to box the bottom corners of the lining, too. Turn your project right side out and press. Improve your pressing skills with my Pressing Tips for Professional Results.
Give your bag more support with my trick for Easy Sew-In Bag Support.
Need a better ironing board? Check out the IKEA Hack Pressing Station of my Dreams.
Boxed Corner Cut Sizes and Finished Bag Sizes for This Tote Bag Project
Here’s how different size corner squares affect the finished size of our sample project.
- 1″ corner = 2″ deep. 17″ W x 15″ H x 2″ D (wide/tall/skinny, fits a large text book)
- 3″ corner = 6″ deep. 13″ W x 13″ H x 6″ D (square/deep, fits a shoe box on its side)
- 4″ corner = 8″ deep. 11″ W x 12″ H x 8″ D (short/deep, fits shoes without the box)
Show Me Your Boxed Bag Creations!
Share pics of your bag projects in my Facebook Lazy Girl Group
That’s Pinterest-ing!
Follow me on Pinterest and pin this post to your Pinterest boards.
Remember to grab the FREE printable tutorial below.
Subscribe to receive emails for my blog and newsletters about new patterns and project ideas.
Enjoy!
Joan
Joan’s Sewing Group | Pinterest
Download this Freebie
Enter your email address below to instantly download this freebie now!Like and share this post with your stitchy friends.


I also think I want to try to make it in a tiny size for gift card for Christmas time for the Grandkids. Should challenge the “boxing” skills some…we’ll see what happens to that bright idea. Visions of using up small pieces of novelty prints are darting through my head…see what you start! Keep it up please. Christie
Oh Joan thanks for the math, it will be a great help to me. Of course I am a picture person to so the tutorial is wonderful. Must get busy!
Penny D in Chesapeake, VA
DO you have a tutorial for the Miranda Bag???? I just purchased the pattern and can’t wait to make it.
Your bag pattern last week inspired me. I have some prequilted fabrics, mostly in holiday patterns, that were given to me. Your pattern gave me the idea to make some modifications, & construct holiday totes as well as smaller gift bags that will go into my quilt guild’s fall auction. By not having to line the prequilted fabrics, I made a band to finish off the top edge. Sue Baker, VA
Thanks so much for taking the time to do these little hints…some of us that have been sewing for a short period of time…these kind of things help…Those of us that have been sewing for a lonnnnnnnng period of time need to be reminded…..thanks again for all the valuable information that you send out to us…for me it is greatly appreciated.
I belong to the latter……lonnnnnnnnng time sewer..kd
I make the Love Tote all the time with boxed bottoms….but I simply turn inside out, match the side seams, mark and pin the depth of the “box” I want. Sew, trim and turn.
Never thought about cutting a square first. I’ll have to try it.
I also make the Love Tote with a half yard of fabric and sew a tall tote instead of a wide tote. They make great wine bottle gift bags.
way to go Joan! This will be very helpful!
Carol at Batiks Etc and Sew What Fabrics, Wytheville, VA
I finish off the boxed corners seam by zig zagging across the seam for extra protetion, too. They’re easy to do.
I also made up cardboard squares starting at 2 inches, 2 1/2″, 3″, etc. for squaring off bags and totes and just draw them onto the wrong side of the fabric and cut them out, 123……
Joan, Thanks for the new tutorial on the boxed bag bottoms had trouble with my 1st one then went to the Towne bag instructions and did ok. I have made at least 5 Towne bags and need a new one for me. Your instructions are the best! Margie
Joan, It makes great sense this week. Do you box the lining separately from the cover or do you box them as one? Love your blog each week.
Sandy
I am looking for a pattern for a “caddy” to hang on a hospital bed or walker.
I am looking for a pattern of a purse I saw made out of chenille fabric. It was about 12″ long and 18″ wide with a flap to close and two purse handles. Can’t find a pattern of anything similar, any ideas?
Love your blog AND your attitude. Hope you don’t mind I’ve posted a link to you from my blog, and borrowed a picture from this post.
Pingback: my half of the brain » Blog Archive » Box the Bottom Corners of a Bag
I love this boxing technique -my triangles would always go wonky when I would try to do it that way, and with this method I then have some little squares already cut out that can quickly be whipped up into four patches! (after a teeny tiny bit of ripping) – I am well on my way to a “cutting the corners” scrap quilt!!!
Pingback: Box the Bottom Corners of a Bag / funkEpunkEmonkE - from CONCEPT to CREATION
This is fantastic! I’m so linking to this!
Thanks so much for going into more detail on the corners. I had trouble understanding their construction in the main pattern and appreciate the great tutorial! Also, thanks for all of your tips on making sewing easier. I’ve used other patterns and changed them so I could use your easier (and faster) construction methods.
I’m eager to make this tote bag – it’s a much better pattern than the one I did recently! Thank you!
I also added a pocket on the inside and a slightly larger pocket (to cover the sewing lines on the outside. I quilted the pockets for extra stability, they look really cute.
Pingback: Link round up « In a Minute Ago
I’ve made many bags over the years using different methods to finish this kind of bottom……over a year ago I came across this method…….I love it ,I get a nice bottom that matches on both sides.
Hi!
I’m willing to try this on a linned bag… I wonder how should I proceed:
1) add the linning and THEN try you square method, cutting them from both pieces together.
2) do the square method both on outer side AND linning and then sew the 2 parts together.
Sorry, I’m just starting and will surely make LOTS of dumb questions till i get the hang of it! LOL.
Hugs from sunny Brazil.
Hi Janaina, Do the second option – square all four corners by themselves, lining and outside. Joan
thank, joan, for your question…i had the same one, and now have my answer !
Marilyn
Pingback: Review: Puffy Pouch Sewing Pattern « Speckless Blog
Pingback: Sewing on Sundays: Tote bags | RebKnitz
Too simple! Nice way! Nice share!
Thank you thank you so much! I was kinda dreading this part, thinking it was going to look a mess but with your very easy directions, my bag looks great!
This is by the far the easiest explanation I have seen of how to box corners. Thankyou so much for sharing this.
I was so happy to find your blog with the Box Bottom Tote Bag. I have several horse feed bags I’ve been saving for just the right pattern and now I’ve found it! Thanks so much!
Love directions on square bottom. However, to keep shape what type
of solid material do you cover and lay flat in bottom. Cardboard could bend.
so what do you recommend?
Pingback: A Ducky New Book Bag « pixartinkdotcom
Thank you for the boxed corner directions…much appreciated!!!
Thank you! I just got into sewing, I’m a real rookie and I find this tutorial extremely helpful! <3
Pingback: Tips and Techniques Tuesdays – 11/29/11 | River Place Quilt and Sew
Pingback: Waste-Free Lunch Tips | Care2 Healthy Living
Thank you Joan! I had instructions in a book and could not make heads or tails of them (something about an apex – what??!!). One look at your pictures and I got it straight away – YOU ROCK! 🙂
Pingback: Sewing Away: May « Daughter of Whitman
Thank you very much for the information, I just needed a little shove in the right direction. Am making gift bags and wanted a flat bottom and voila I have flat bottoms now.
I am an avid crafter but sewing is about my least favorite task and the handicraft I am probably least adept at (especially with the machine). This was especially helpful; thank you for sharing. God bless.
OH … THANK YOU SO MUCH!!! I absolutely could NOT figure this out in my mind. It’s been holding me up for a month in making my mom a special bag! SO THANKFUL to you sharing your simple directions!!!
Pingback: Upcycled Shopping Bag | argylesugar
Pingback: Present Report, Part 3 | Inside Quilters Newsletter
How do you get the bag to go on an angle like that (wider on top and narrower on at the bottom) when the pattern calls for straight edge rectangles?
Pingback: “I Made That!” Monday – Zipping Along | A Stitch to Scratch
Wow- this info about the cut corners of a tote bag were EXACTLY what I needed! Thank you! I hate pinching the corners of bags and trying to figure it all out- hoping the seams will match.
Thank you so much!!! I finally understand!
How do cut the fabric so that the width of the bag is the same from top to bottom after I make the boxed bottom. I understand that you lose 4 inches with a 2in cutout at the bottom. Any helpful suggestions would be great.
I loved your pattern directions. I’ve looked all over and yours is the best by far. I also want to thank you for the examples of sizes and what cutting out the bottom square would do to the size of the bag. Thank you, my bag turned out great.
I am a fan of your site and enjoy receiving your newsletter.
I am wondering if I’m doing it wrong but when I measure my corner square for the boxy look I start at the sewing line, not a the bottom of the fabric because it will be less than 2″.
Could you clarify this for me.
I’ve been wondering about leaving the triangle of the corner and folding it so that it actually SHOWS on the outside of the bag.. Wd you know how to pull that off?
Thanks for this, hope it’s ok to link to rather than reinventing the how to for a bag post I’m writing
How do I finish off a large oval hole with another material? Want to use a different fabric and it seams to pucker and be weak at the oval edge.. Oval hole is about 6 inches.
Are there any tutorial for any of your bags.. with pictures?
Hi Vanessa, All of the designs are available as patterns with complete step-by-step instructions and photos!
Thank you for this fabulous tutorial. I was going to simply crochet around some fleece for a little blanket, but now I’m quickly putting together some messy navy stripe/my little pony fleece totebags for a pile of girls and I’m so excited to try these box bottoms. If I fail, the girls won’t know and if I succeed, wow, so many applications. Your pictures are amazing and I DID IT!!!!!!!!
Thank you for this. For whatever reason when I try to do it the “pinch, sew, and then cut” way my lines are never straight.
I am in search of a pattern or directions for making a box bottom pouch that isn’t narrow at the bottom and wide at the top. I believe this happens when you “cut out” the little squares at the bottom as opposed to sewing across the triangle (you know, the other way to make the box bottom). I noticed your picture looks like the sides are straight all the way down, but it’s kind of hard to tell. Can you give me a little insight?
Thanks
Can you explain how the gusset or box bottom above reduces the height/width of the bag, based on a 16″ by 19″ bag…I am just not getting it, can you give more details please…thanks
Can someone please clear this up for me. I am getting conflicting info from different tutorials. When creating the “formula” for a tote, is the seam allowance part of the “square” that is cut out? Some sites say yes and some say no. Can someone please explain this in a simplified way for a beginner. I would like to know before I cut my fabric. Thanks so much.
Just to add what someone had written in regards to including/not including the seam allowances in the size of the cut out squares:
“You would measure your one and a half box from the edge of the corner, including the seam in the box, because when you sew the new edge a half inch in you are adding the half inch seam allowance. So, while you are only cutting one inch into your bag, when you sew a half inch from the New edge it makes your seam one and a half inches, and your corner ends up a perfect three inches.”
“you are absolutely right. If you want a 3 inch bottom the stitching line should be 1.5 inches from the original stitching, so I would only cut 1.25 inch square so you have .25 inch for the corner seam.”
Thoughts anyone?
Thank you! I was just trying to figure this out for a bag to hang on the rail of a hospital bed. I never even thought of the width of the bag being affected, just the height. That would’ve been an epic fail.
I have the pattern for the Becca Bags and am confused about the size to cut the material. It only gives one measurement, for example for Large Becca, it says Top Band 2 1/2″. What should the width be?
This is a wonderful tutorial. Does anyone know how to figure out a predetermined size of a tote? For example, if I want the finished size of my tote to be 18 width, 17 length, and a 5 inch box bottom, and using a 1/2 inch seam allowance with a 1 inch hem at the top., what size would I cut my fabric pieces, and what size square would I cut out for the bottom, based on the reductions that will take place as described above. I have searched and searched for this answer and can’t find it or help. It might be very simple, but I can’t figure it out. I made a tote the other day based on what I thought would be the correct formula, and it came out Gigantic. I would be ever so grateful if someone on here would respond. Thanks.
Now this was well explained. Thank you for these perfect illustrations, explanations and various examples. They will come sooooooo handy. Again ty 😉
This is awesome! Makes perfect sense and will result in a much nicer finish that the ‘pinch the triangle’ method. I have no idea why I had not thought of this before or seen it anywhere. Love it! Thanks so much or sharing!
Hello
Do you mean to measure on the stitch line to cut out for the corner?
Cut a square from each bottom corner.
This is a 2? square which will result in a 4? deep boxed bottom.
The size of the cut square will determine the depth of the bag when boxed.
Thank you B.
I am a little confused. Do you measure
the stitching line to cut out for the box corner or measure from the raw edge of the fabric? Thank you
I am sewing a purse with 12″ vynil bottom length. Everytime I sew the box, it comes out 8 inches and looks unproportional. What should I do.
I would like to buy two patterns please .The Box the Bottom Corners of a bag.
Well I wish I knew this last night. This is a whole lot easier than sticking your hand inside trying to feel for the seams and hoping and praying it works thank you so much!!!!!!!
Pingback: Easy Ways to Perfect Box Corners – Triangle or Square – Craft on the Common
Pingback: Adventure Wristlet: A Bag to go from Trail to Town - Happiness in Eclecticness