How to Make and Sew In a Custom Support for Your Bag Pattern
Make a custom sew-in bag bottom to support bags made from sewing patterns.
Lazies, Get ready to support your bags in a whole new and easy way! Check out this easy step-by-step tutorial for creating and installing a custom bag support during construction, then grab a FREE printable tutorial (a $9.95 value) below. So let’s take a look at this crazy-good and convenient sew-in bag bottom, to keep your bag from sagging!
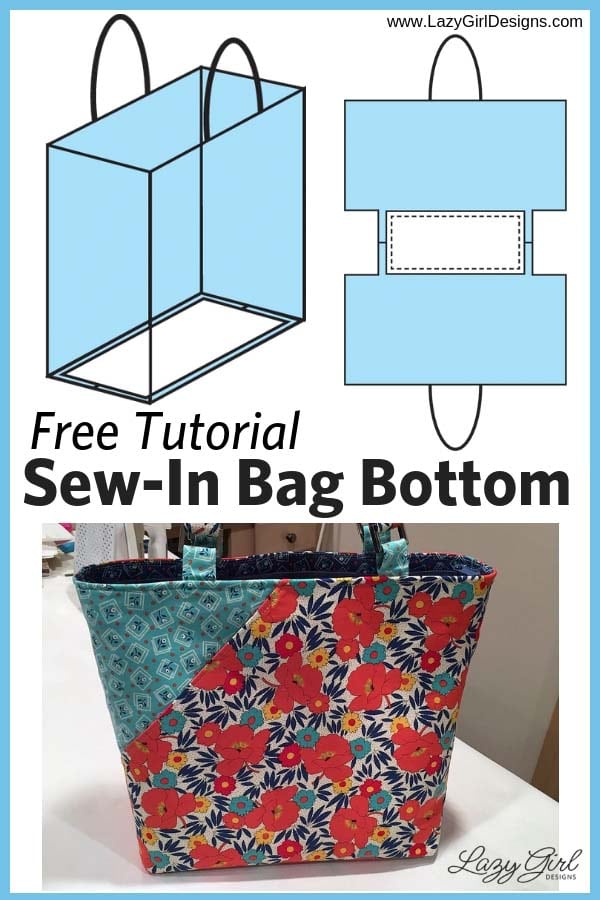
A Better Option To Support Bags Made From Sewing Patterns
Our Stiff Stuff firm sew-in interfacing SLG107 can be cut to size and sewn directly into the bottom of your bag project for good support to keep your bag from sagging. Stiff Stuff is lightweight, flexible, and yet sturdy enough to offer the support your bag needs. It offers flexibility that our acrylic, rigid, pre-cut Bag-E-Bottoms can’t.

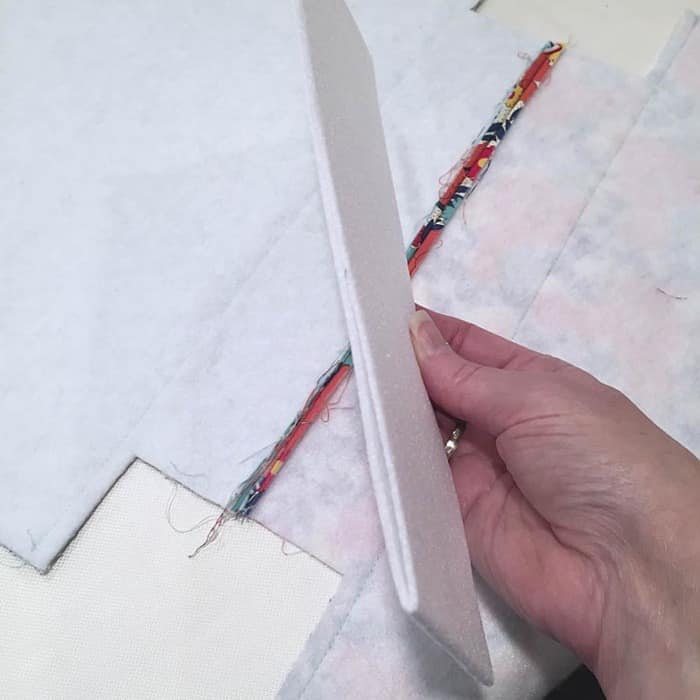
That extra line of stitching around the bottom
of the bag means there’s Stiff Stuff built-in.
Reader Favorite Videos
This post contains Amazon affiliate links. I make a commission when you order items through those links.
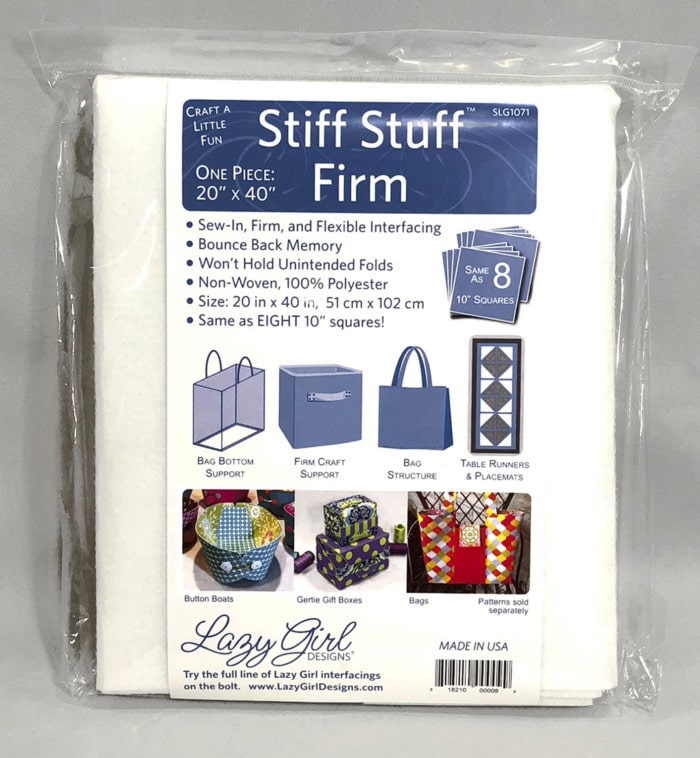
Stiff Stuff Firm Interfacing
Stiff Stuff interfacing is a sew-in product. It is not fusible and there is no adhesive on it. Find Stiff Stuff on the bolt, packaged pre-cut yardage, or in packaged squares, available online or at your local quilt shop. Link: – Stiff Stuff interfacing
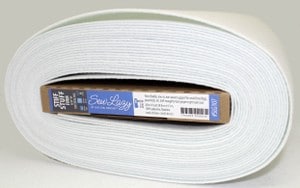
Stiff Stuff Firm interfacing on the bolt in 20″ width. Perfect for medium to large bags, plus sew-in bag bottom support. Item SLG107, SLG10720 from Lazy Girl.

Stiff Stuff Firm interfacing in the 20″ x 40″ package. Enough for a medium to large bag, plus sew-in bag bottom support. Item SLG1071 from Lazy Girl.
How To Use Stiff Stuff for Bag Support
Use scissors or a rotary cutter to cut Stiff Stuff to size to make a bag support. Add the support to your project after sewing the bottom seam but before sewing the side seams.
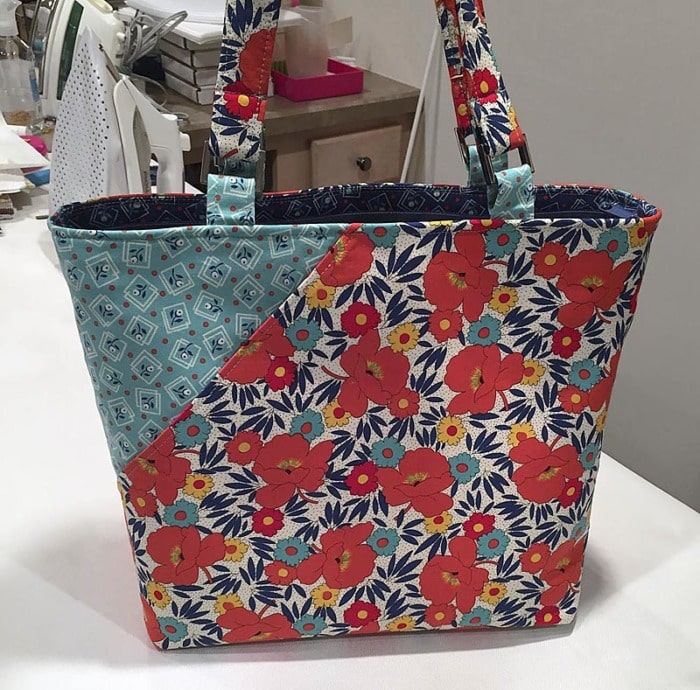
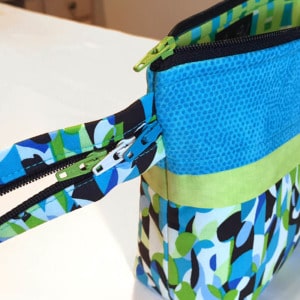
I use our Candice pattern LGD130 in this tutorial. This method will work for bags using my construction technique (Harper Holdall, Margo Handbag, Claire Handbag, Miranda Day Bag) and bags constructed as bucket in a bucket style where you create the outside bag and inside lining, then ‘stack’ one inside the other and sew along the top edge.
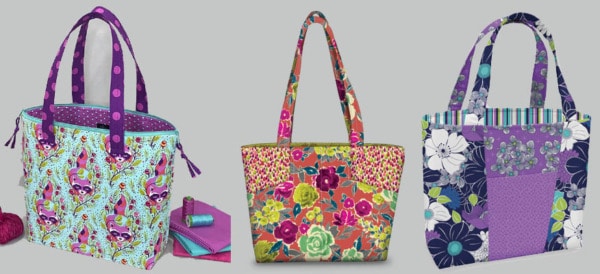 Harper Holdall, Margo Handbag, Claire Handbag
Step 1: Determine Size of Bag Support
- Sew the bottom seam of your bag, press the seam allowance open.
- Measure the width and length of the bottom of your bag where shown.
- Cut the base 1” shorter than the length and the same width as the cut-out corners.
- Keep the base 1/2″ from the cut edges of the project to accommodate seam allowances.
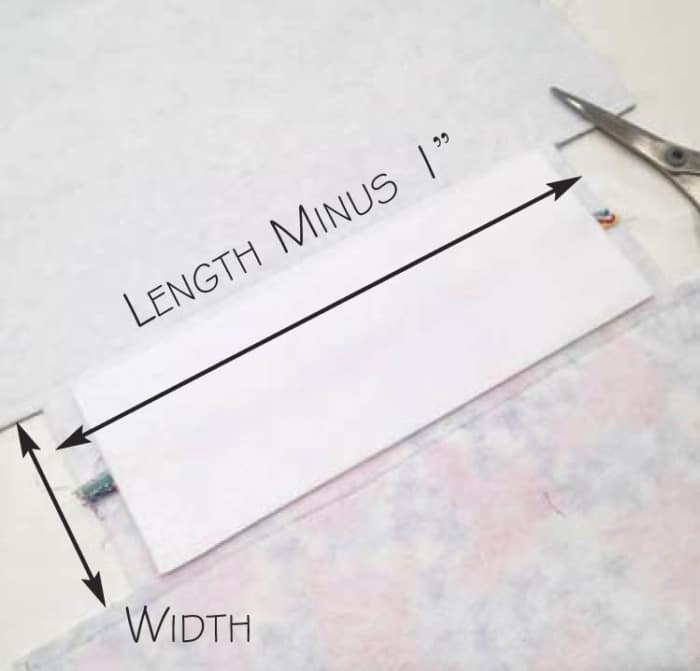
Formula: Length minus 1 in x Width as shown.
Step 2: Number of Layers
- Because Candice is a large-ish bag, I used two layers of Stiff Stuff. In this case, I just cut one long piece and folded it in half.
- Use one layer of Stiff Stuff for small to medium-sized bags. Use two layers for larger bags.
- When using two layers, add a bit of glue/tape between the layers just to keep them together during stitching.
Use one or two layers for support.
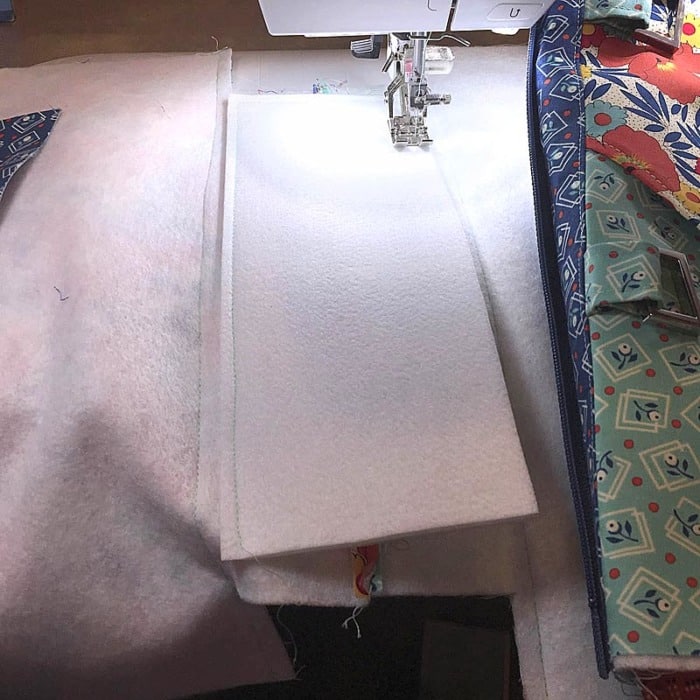
Step 3: Stitch In Place on Your Bag Project
- Lengthen your stitch to 3.0 to accommodate sewing through all the layers.
- Stitch 1/4″ from the edges of the Stiff Stuff.
- Stitch through all layers to attach the base to your project.
- Tip: You can use double-sided tape or a bit of glue to hold the base in place while sewing.
 Sew in place before boxing the bottom corners.
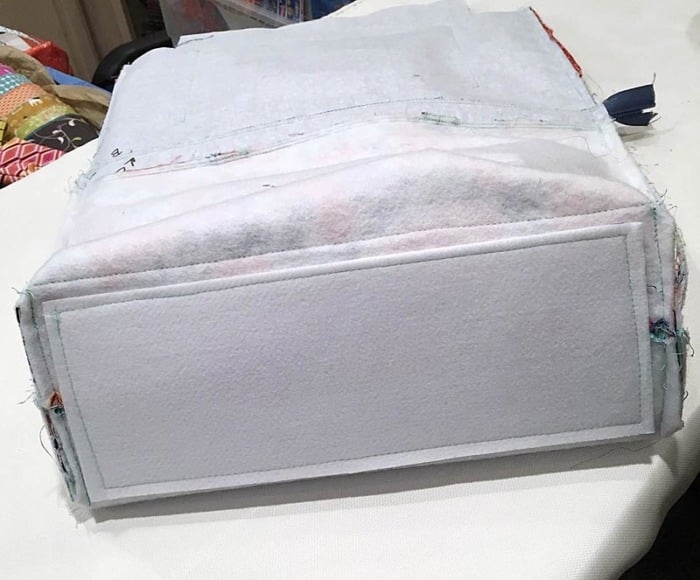
Step 4: Finish the Side Seams, Box the Bottom Corners
- Finish the side seams and box the bottom corner seams.
- You can see the Stiff Stuff is safely away from the seams.
- Stiff Stuff is flexible enough to easily turn the bag right side out.
 Stitch around all four edges of the Stiff Stuff base.
Follow my free tutorial to easily master how to Box the Bottom Corners of a Bag.
- The stitching will show on the outside bottom of your bag.
- Tip: use a thread color that coordinates with the fabric.
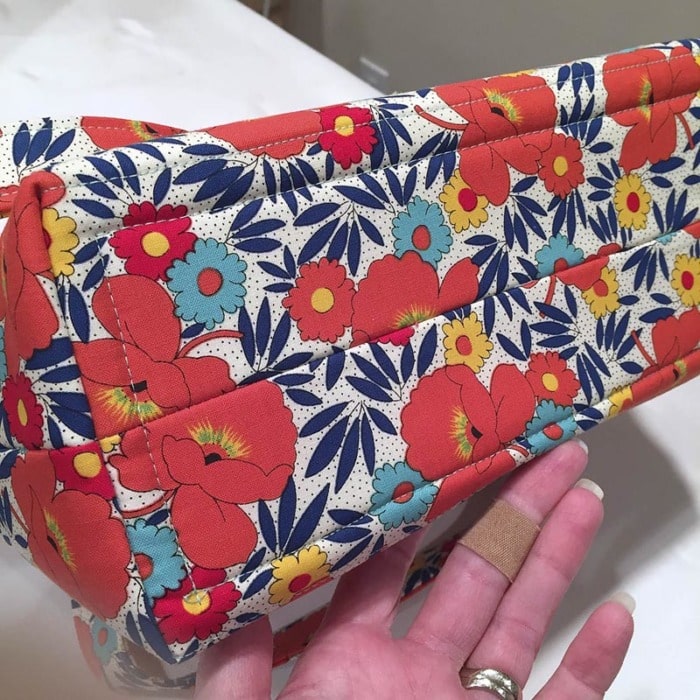 Stitching the base in place will show on the bottom of the bag.
This simple trick of sewing the Stiff Stuff interfacing into your bag provides stay-in-place support for great posture. Fabrics are ‘Harlow’ from QT Fabrics.
For more free sewing tutorials, follow my Pinterest board Free Sewing Tutorials, Tips & Hacks
Finish With Professional Pressing
Give your gorgeous finished bag a good pressing to:
- Give the bag great shape
- Create posture to help stand tall
- Build memory to help keep its shape
For great results follow my tips for Pressing Your Bag Creations for Professional Results.
Supporting the bottom of the bag will help the sides stand tall.
Want a better ironing board? Check out the How to Make the Ironing Board of Your Dreams.
Additional Bag Bottom Options
Another way to incorporate Stiff Stuff support is to create a separate false bottom that sits on top of the lining inside of your finished bag. To make, cut to size and cover with fabric, then place inside your finished bag. It will be held in place by the purse contents.
Purse feet can be added through the Stiff Stuff for extra stability.
Note – Since our Bag-E-Bottoms were sized to fit our bags, you can simply cut Stiff Stuff to those dimensions and you are good to go!
Where To Buy Pattern and Stiff Stuff Supplies
Stiff Stuff Firm: 20 in x 40 in

Get our Candice pattern here:

Stiff Stuff is also available in yardage cut from the bolt (SLG107, SLG10720), or
Pre-cut packs of 10″ squares (SLG107SQ).
Check your local quilt shop for both. The 10″ squares will work for small/medium bags. Pick up a 1/2-1 yard from the bolt and tuck away so you always have it. Stiff Stuff can be folded/rolled. Press with a press cloth and heat/steam to remove wrinkles/folds.
Claim your FREE printable tutorial (a $9.95 value) below! Print it and keep it with your patterns for reference.
Like and share this post with your stitchy friends. Join me in the Lazy Girl community on Facebook here: Facebook Lazy Girl
That’s Pinterest-ing!
Follow me on Pinterest and pin this post to your Pinterest boards.
Enjoy!
Joan
Stiff Stuff Bag Support
Download this Freebie
Enter your email address below to instantly download this freebie now!Like and share this post with your stitchy friends.


Great bag idea. Here in Australia where I live, single use plastic supermarket bags have been discontinued. I am making several crocery bags and the tutorial will be helpful to ensure a quality result.
I like the idea of removable bases as these can be used in several different bags and removed for cleaning.
Thanks for such a great tutorial.
dis goed om te weet hoe om dit te doen sukkel n jaar lank om te weet hoe om n sak se voering te doen. baie dankie
So I subscribed but where is the free tutorial?
i cannot find a source to order the “stiff stuff” interfacing or the size A or F bag bottoms. Please help!
Hi Joyce, Thank you for asking about our Stiff Stuff. Here are two links for purchase options.
https://www.fatquartershop.com/nsearch/?q=stiff+stuff
http://amzn.to/2FZwIMN (affiliate link)
We’ve discontinued our line of Bag-E-Bottoms because we have a better, more flexible option which uses Stiff Stuff. See our free tutorial here:
https://www.lazygirldesigns.com/bag-bottom-tutorial/
I am reference this tutorial on my 7 Essentials Tools for Sewing and (an Honest Sewing Machine Review) Page. I hope you do not mind. http://www.lifelivedhonestly.com
Love this bag
Sorry, is this image showing two outside pieces sewn together at the bottom or the outside sewn to the lining at the bottom? So, you sew the two outside pieces together first, then the sides? I don’t understand. Thanks
Hi Bev, Thanks for asking about this. The tutorial shows the two outside pieces of the bag sewn together at the bottom seam. The bag support is sewn over the bottom seam. Then complete the bag as usual.
Orrrrr make a pocket in the bottom of the bag and slide a piece of plastic, as in the fabric grocery totes, then slide it in, and out for laundry. Works for me, stiffer and doesn’t break down. .
There was not a link for the free printable pattern.
I sent a reply early this norning with my email address, but did not receive a link for the pattern for the bag bottom.