Quick Gift Bags For Little Things
Lazies, I’m still making last-minute gift bags using the free With Love Tote pattern that I posted previously.
New to our blog? Subscribe here.
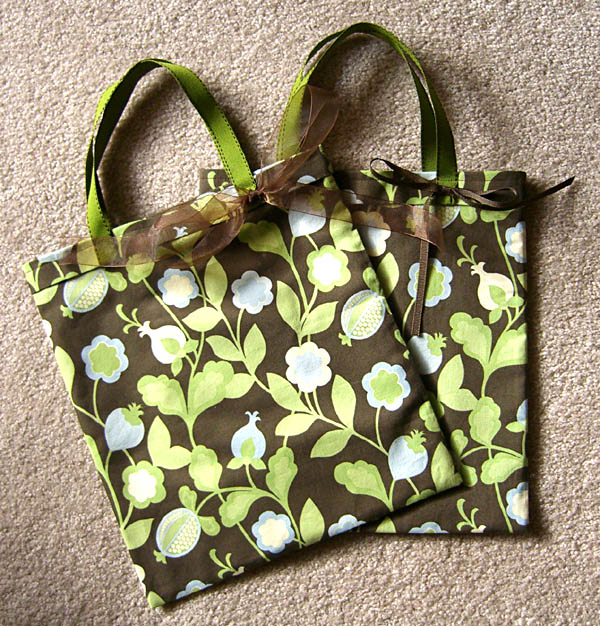
Smaller size of the With Love Tote bag.
Fabric is ‘City Girl’ by Benartex.
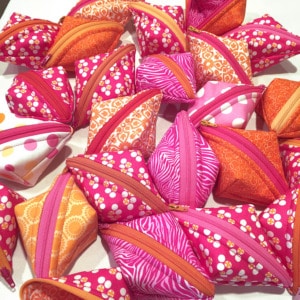
Small Gift Bags
The With Love Tote bag is perfect for gifting anything the size of a shoebox or so. But what about smaller items?
I’m making smaller versions of the same design which turns out to be perfect for little gifting. Or, should I say, things that come in smaller packages.
These little cuties finish to 10 inches wide by 11 inches deep. I used 15-inch cuts of grosgrain ribbon for the handles.
This smaller size bag is wonderful for a one-pound box of chocolate. And they take about 15 to 20 minutes to make. Now that’s Lazy.
Make Two Small Bags
You can get two small gift bags out of two-thirds of a yard of fabric. I started with a 24-inch cut, or two-thirds of a yard of fabric, approximately 42 inches wide. I cut the selvages off and cut the fabric right down the middle, or on the fold. That produced two pieces at approximately 21 inches wide by 24 inches long, enough to make two small bags.
Fold each piece in half, right sides together, measuring 10 1/2 inches by 24 inches. Then follow the directions for the With Love Tote to finish the bag from there.
Add A Bit Of Detail
The handles have a little belt loop at the bottom due to the way they are attached to the bag. Here, I’ve tied a decorative ribbon through one hoop. This is also a nice place to hang a gift tag. You could also feed a ribbon through all four hoops for a simple drawstring closure.
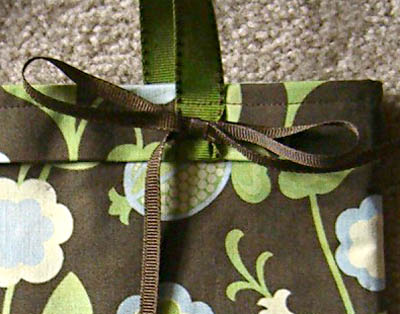
Tie a ribbon around one handle for a decorative bow.
Product Recommendation
One of my favorite finds in the last few years is Res-Q Tape. Oh honey, keep a roll of this handy.
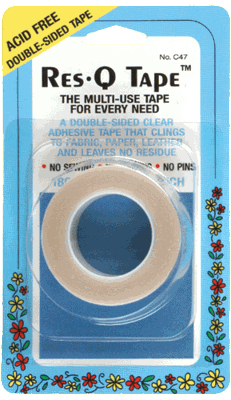
Res-Q Tape from Collins.
Res-Q Tape, from Collins, is a double-sided tape that sticks nicely to the fabric. A five-yard roll sells for between three and four dollars. Check with your local quilt shop for availability.
When adding handles for these totes, I held the ends in place, under the cuff, with a short piece of Res-Q Tape. I simply placed the handle end where needed, then put a two-inch piece of tape across the end of the ribbon just like a band-aid. The Res-Q Tape is completely hidden under the cuff and holds the layers together for sewing.
For this small size, I skipped the step about stitching through the handles below the cuff as shown in last week’s post. I stitched through all layers around the top edge of the bag, catching the ends of the handle under the cuff in that stitching.
Edit: Darlene wrote in to say that Res-Q Tape will gum up your needle. Consider trying ‘Wonder Tape’, also by Collins, instead. Thanks Darlene!
Enjoy!
Joan
Joan’s Sewing Group | Pinterest
Like and share this post with your stitchy friends.


These are great – and it is also a great size for a magazine or book of crossword puzzles or something like that.
You really like that bordered ribbon, don’t you?! I keep seeing it crop up in your samples. I really need to find myself some of that!
Thanks for more great ideas! My machine is going to be humming right up through – and beyond- Christmas!!!
Pingback: Gift Ideas: Unique Personalized Gifts for Men & Women » Quick Gift Bags For Little Things
joan … this is a great small bag and i love the colors and the extra ribbon on the handle … however i just wanted to point out that *res-q tape* is a good thing, but you can’t stitch through it without it sticking to the needle … collins (the same company) makes *wonder tape* for the same price (and mostly the same purposes) BUT you can stitch through it and it does not stick to your needle …
just a thought ….
What a great idea, I think I will make one for the doll and her couch because I am having a difficult time finding a box to fit the couch in but this is a great idea, 20 minutes and I will be done! Thank you,
Penny D in Chesapeake
Can’t wait to make some of these! I loved making the “With Love totes” and my recipients loved them too. Thanks Joan, for sharing these gems with all us lazy girls! Merry Christmas!
gracias por tanto que me regalan para tener ideas y ayudarme a mi economia, y ha poder dar algo bonito hecho por mi.
clotilde salamanca
Great idea as usual Joan! All of us use gift bags of all sizes for our gift giving. It is extra special to get a gift in a home made gift!
Pingback: Free Tote Bag Pattern from Lazy Girl / Quilting Gallery
Pingback: Make a simple tote bag in one hour
Hi-
Thank you SO much for generously offering the with love tote pattern. I can’t believe how easy they are and ingenious!
Just wanted to share an idea. My daughter (2nd grade) hauls her boots to and from school and I needed a bag for her. People suggested a towel bag, but she was not fond of that idea.
I purchased a vinyl tablecloth (clearance) and used your pattern to make a boot bag. I made it larger and did box the bottom of the bag, but it worked great.
I love that with a few stitches the outside and lining of the bag are done!
Thanks again. I just purchased the runabout and wallet patterns – can’t wait to try for my sister and I who are taking a trip together and need something to hold our passports.
I think these bags are just the cutest things ever!!!
Hi there from Australia
I have used this fabulous little bag pattern as a tool while teaching a friend to sew. It was so simple and we both enjoyed the experience. Lyn has made several more since and is very proud of her efforts. As she is a ceramics teacher and makes cards, this was a complete change from her usal pursuits.
I also made a very miniature bag to hold a gift of jewellery to send to Nepal our the little girl, Ruma, who my family sponsors. It looked very cute, only about 4″ square with ribbon handles, and I threaded an extra ribbon through the slots to use as a drawstring.
Thanks for such a great pattern
Thanks so much for the cute bag pattern-I made on last night for a little gift to my granddaughter-I love those easy patterns. I plan to make on tonight for a baby shower-any other patterns out there that are super quick and CUTE!!! Thanks-Linda/Texas
how do you box the bottom to make it wider as indicated by Jilll?
i thought this was a great design..i just wish i could find a nice bag idea for going to the beach. I need a bag that looks more like a purse than a tote and is big enough to hold things for the beach.
I make similar for making totes for bottles of wine, etc. for the holidays. I make 3 out of a yard of material. The ending sizes are approx 6 1/2″ X 14″. I cut the strips 14″ X 30″ then fold them in half, 7″ X 30″ then follow the basic tote patern instructions or follow Joan’s instructions for the “With Love Tote.” The only difference when I make them for holding a bottle of wine is that I I use the polypro 1″ strapping, 18 inches long when making them and I don’t turn under the cuffs. I run a row of stitches around the top of the bag and go over the handles several times to strongly secure them in place. Seeing that I only use strips of 14 X 30 inches for each one which is less than a yard of fabric, there’s actually enough fabric to make matching handles from a yard of fabric, using two inch strips for each one, by the 18 inch (half a yard) lengths.
The wine totes are not just for bottles of wine: For youths and those under 18 years of age, possibly plastic bottles of their favorite soda or juice, etc., can be placed in one of them. For senior citizens, that might be either orange or apple juice, too. Most likely bottles of beer for the sports fans during the Super Bowl games home parties along with individual size packages of snacks, etc. Maybe even used in place of stockings for hanging up during the Christmas holidays, too, possibly filled with apples, oranges, pears, etc.
I LOVE this mini-tote! I made the larger one and then with some creative fabric cutting was able to get another 7 of the mini size out of about 2 yards of fabric. I did change it up a bit and use contrasting fabric for the lining, so that made an extra seam, but still very easy and quick to do.
These will be project bag gifts to my knitting buds.
I just thought wouldn’t a even smaller version hung from one the “belt loops” be really handy for keys or spare coins!
Pingback: Quick Christmas Gifts (Part 1) |
An Indian friend asked me to sew bags for Thank You Gifts for a funeral. These bags are great to make a lot in different sizes and color contrasts. Thank You for making my job easier. I’ll always use these patterns for gifts.
Pingback: Lazy Girl | Blog » Quick and Easy Last Minute Holiday Projects
What a wonderful project. Thank you for sharing the pattern. I made 2 library totes as gifts and discovered something in the process. If you use a whole yard of material (like in the larger sized one), you’ll end up with a wider bag than you need. Not a problem. Just tuck/fold the ends inward about 2 inches and top stitch the outside edges on both sides of the bag. You’ve made 2 nice inside pencil/pen pouches and the bag is more proportional. Finished size approximately 13″ wide by 10″ high.
Also, if you want to make one larger inside pocket, then tuck in only one side the amount of inches you desire (e.g., large enough to hold scissors). Although not technically necessary, I would top stitch both sides to give it a finished look. Voila! You have a sewing tote, perhaps, for accessories, etc.
I know I’m finding this well after it was posted, but I’m dying to see the photos because I can’t wait to make these for friends. Any chance you could fix the site so the photos show up here? It sounds like this small bag has a different suggestion for handles than the larger one and I’m a very visual person. Thanks in advance and love the simplicity of this!! ?
Hi Nicole, Thanks for asking about this and letting me know there was an issue. I’ve fixed it and you can see the images now. Thanks again! Joan