How To Make A Perfect Yo-Yo Every Time
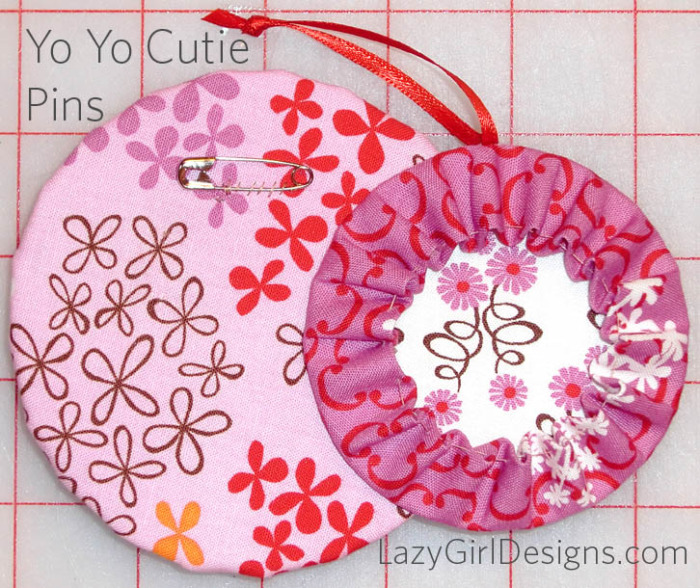
Lazies, It’s easy to make perfect yo-yo’s for your next sewing or quilting project. You know I love yo-yo’s. So, while I was making some recently, I put together a tutorial. Here is a step-by-step tour of using the Clover Yo-Yo Maker tools. And once you’re hooked on yo-yos, use the link below to hop over to our Yo-Yo Cutie Pins post and grab a free pattern.
Subscribe to our blog so you don’t miss a juicy morsel.
Yo-Yo Maker:
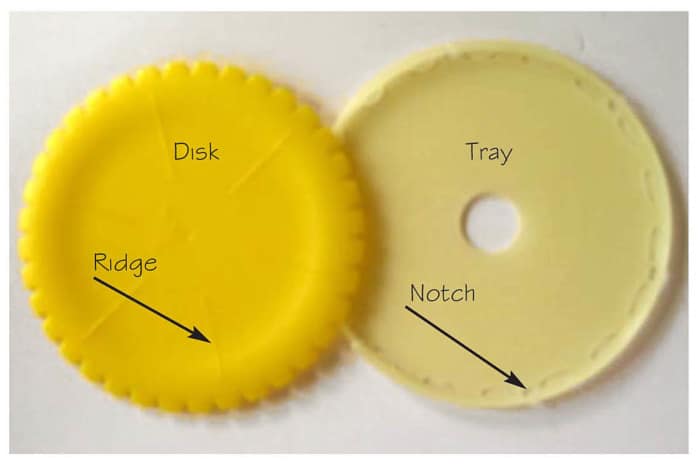
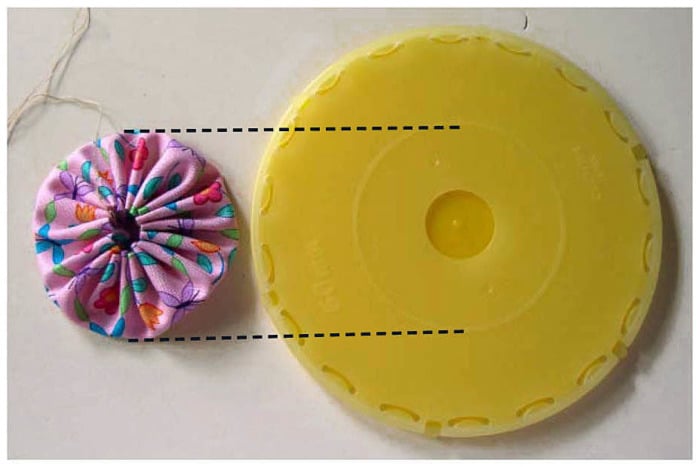
Each Clover Yo-Yo Maker has two parts: a disk, shown in dark yellow to the left, and a tray, shown in light yellow to the right. Place a piece of fabric between the disk and tray, snap together and go.
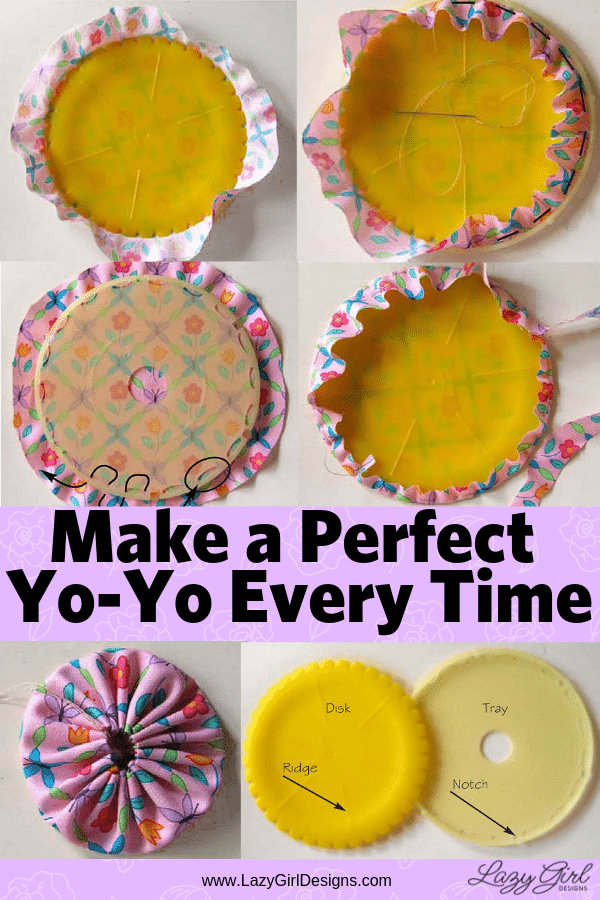
The tray and disk need to be aligned with each other on the round yo-yo makers only. Match the ridge lines on the disk to the notches at the edge of the tray. You can see a couple of details better with the disk snapped into the tray.
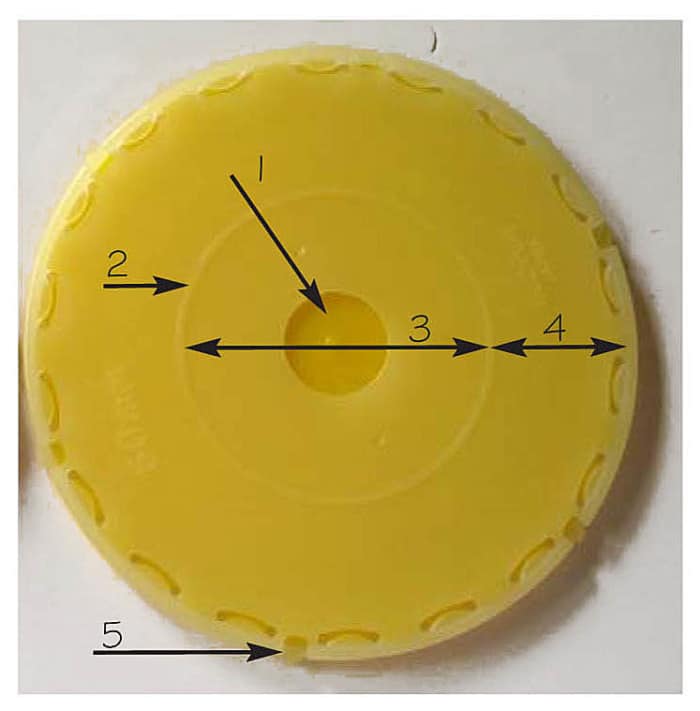
Yo Yo Maker Details:
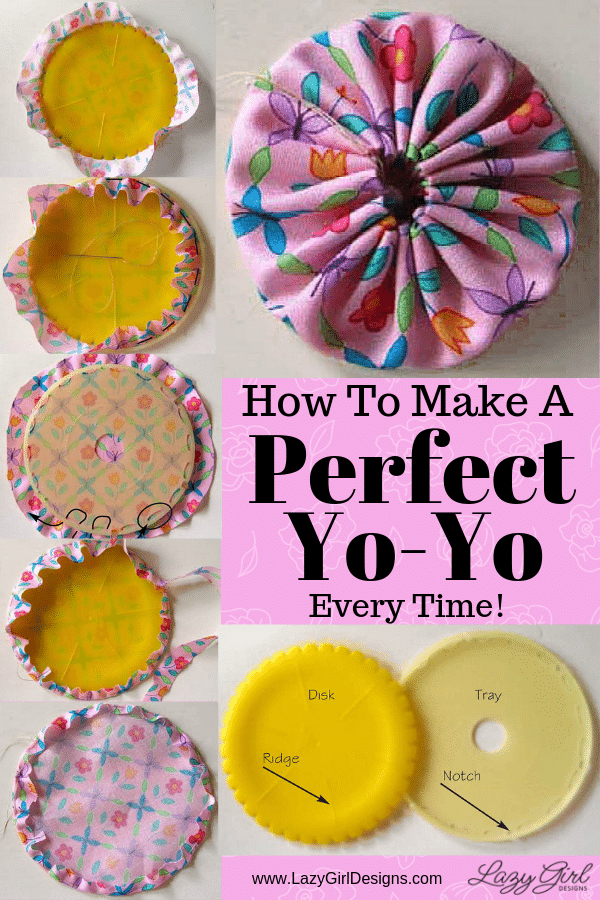
1. Use the hole in the center of the tray to pop the disk out when done.
2. This slightly raised ridge is the finished size (outside edge/ fold line) of the yo-yo made with this tool. Each tool has a finished-sized indicator (either a ridge, or a hole the size and shape of the yo-yo).
3. Area inside the ridge will be the back of the finished yo-yo.
4. Area between the ridge and the edge of the tray will be on the front of the finished yo-yo. See Note below.
5. Use these notches to align the disk for round yo-yo makers only.
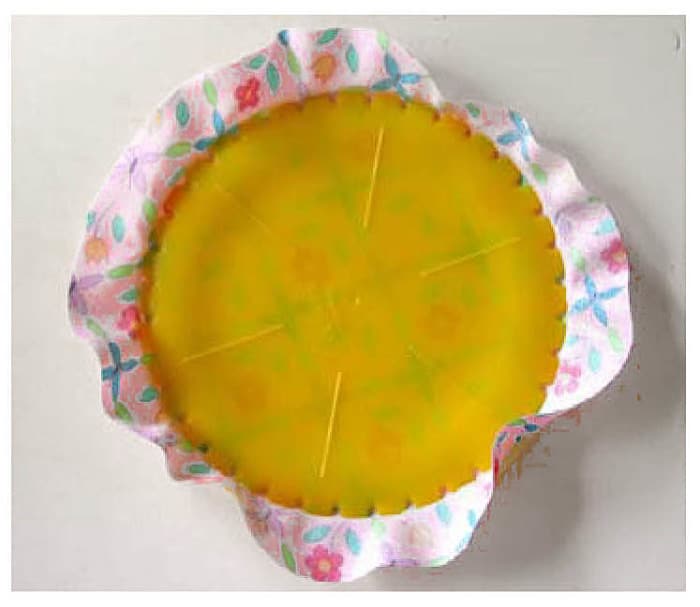
Cut a piece of fabric slightly larger than the disk. Place fabric, right side down against the tray. Place disk on top of the tray. Be sure to match the ridge lines on the disk to the notches on the tray (for round yo-yo makers only as shown in the first photo above).

These little crescent shaped openings (circled above) on the tray are the stitch guides. Bring your needle up at one end of the crescent and back down through the other end of the same crescent as shown above. Catch the seam allowance in this stitching.
Note: Remember the round ridge line marked #2 on the tray in the second photo from the top? You’ll be able to see your fabric through the tray making it easy to know which part of your fabric will end up on the back (area #3 above) and the front (area #4 above) of the finished yo-yo. Use the tray to fussy-cut your fabric if desired.
Fold the fabric seam allowance over the disk and pinch with your finger and thumb to secure for stitching.
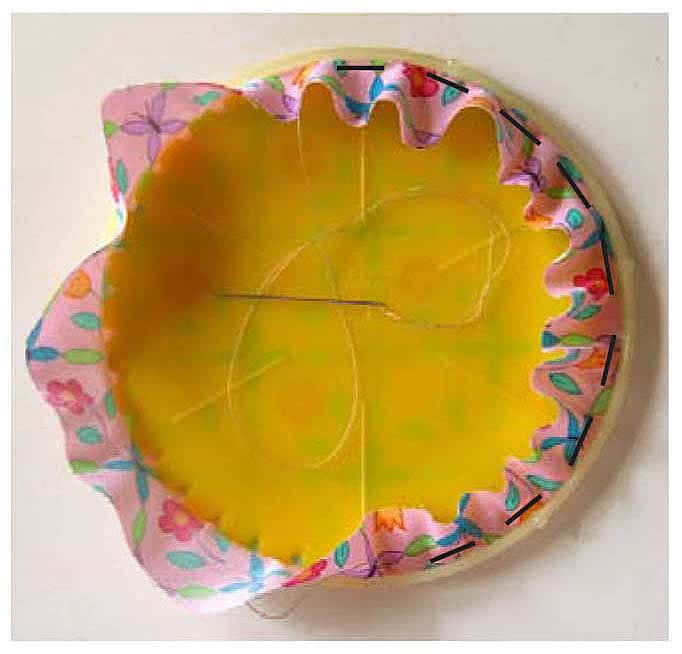
– With a needle and thread (knot the end or leave a tail) stitch from the disk side, through the folded seam allowance, finding the opening of the crescent on the tray and pull needle/thread through. Continue holding the seam allowance flat against the tray.
– Finish the stitch by sewing through the other end of the same crescent.
Work your way around the rest of the yo-yo. Pop the disk out of the tray by pushing through the hole on the tray. If you have too much seam allowance, trim the excess now. Be sure not to cut the stitching thread.
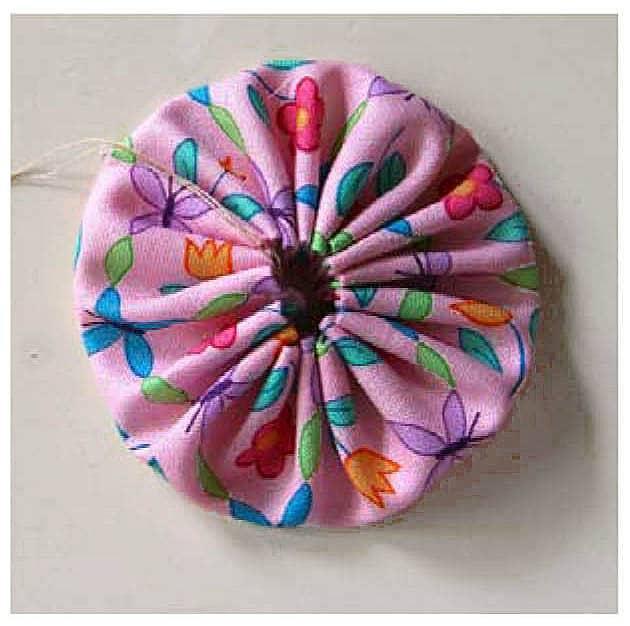
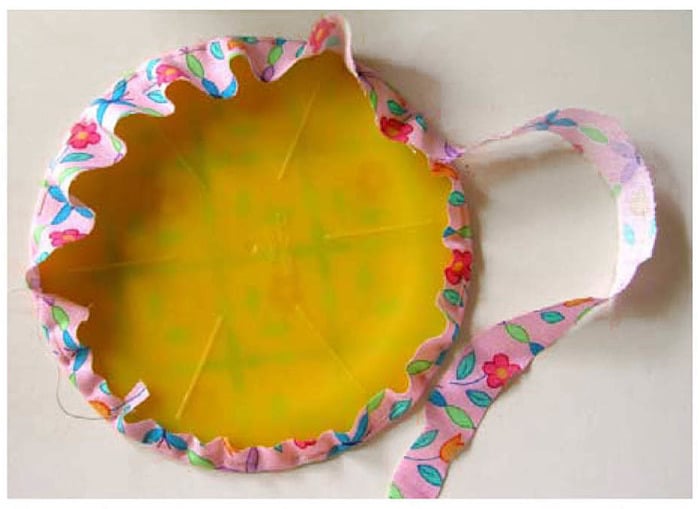
Gently fold the seam allowance over the edge of the disk to remove the disk. Your project should resemble the picture above at this point.

Gently pull on each end of the stitching thread to gather the fabric into a yo-yo. Gently shape the yo-yo as you go to keep the gathers in the center.
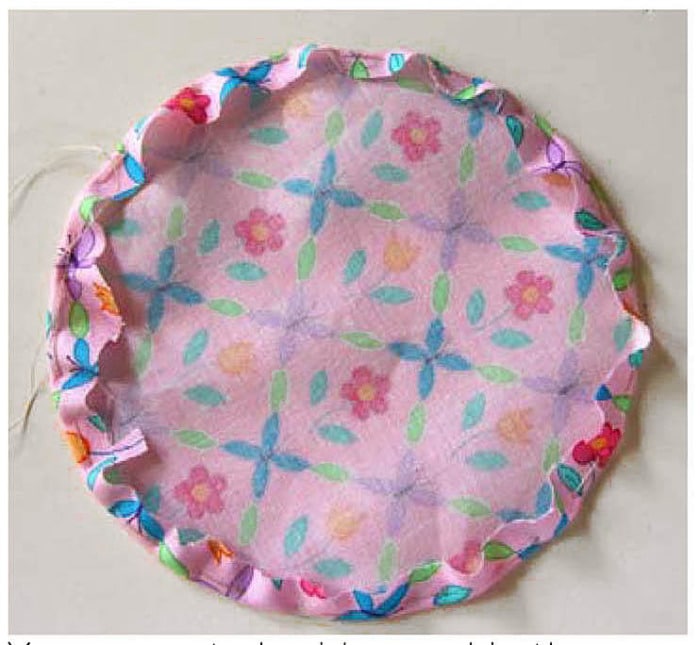
Tie the threads and feed them into the center of the yo-yo for a clean finish.
The finished size of the yo-yo matches the round ridge on the tray for this tool.
Quick Yo-Yo Makers from Clover Needlecraft Inc. This is an affiliate link to Amazon.com and I will make a small commission if you buy through this link.
Original Sizes:
Round – Small, #8700
Round – Large, #8701
Subscribe to our blog so you don’t miss a juicy morsel.
That’s Pinterest-ing!
Join me on Pinterest here, remember to ‘Follow’ me there, and pin this post and pics to your Pinterest boards.
Free Pattern
Hop over to our Yo-Yo Cutie Pins post and grab a free pattern!
New to our blog? Subscribe to get emails so you don’t miss a juicy morsel.
Like and share this post with your stitchy friends.
Join me in the Lazy Girl community on Facebook here: Facebook Lazy Girl
Enjoy!
Joan
Facebook Lazy Girl
Pinterest Joan Hawley
Pinterest Lazy Girl Community
Instagram @JoanHawley
Twitter LazyGirlJoan
Tutorial fabric is ‘Garden Party’ by Gerri Robinson of Planted Seed Designs from Troy Corporation.


Thanks so much for this tutorial! I’m so new to sewing that my machine is still sealed in the box. (And has been for months.) I’ve been reading your blog for a few weeks, and really didn’t understand how the yo-yos work, even though you’ve had great explanations. This tutorial was just what I need! The funny thing is, I don’t need my machine! Yet…
Clover is so creative! So many neat tools to make sewing so easy. Thanks Clover. Doris
Hi
My husband had surgery today. While my mom and I were in the waiting room, another lady was making yo-yo’s using your tool. She said she got it at Joanne’s we searched, searched so I decided to look on the internet, and I found you. Yeahhhh How do I get the yo-yo makers. can i buy them from you. I hope so.
Thanks,
Miriam Bates
Miriambates3@hotmail.cm
– – – – –
Hi Miriam,
You can find all of the Clover Yo-Yo Maker tools at their website here:
http://www.clover-usa.com/cat.php?k=67640
Joan
I just want to thank you for such an informative piece about yo yo’s.
I have a whole box of old fabric yo yo’s and circles that I have been trying to finish.
They have to be at least 50 years old. My friend who is a quilter too had a new book and lo and behold they had a pattern for a yo yo basket.
I am slowly getting it sewed together.
thank you again and I love the free patterns.
Nikki Bramante
Pingback: Yo-Yo Maker Tutorial : Craft Blog
Hi,
I have heard all about these fantasic yo-yo makers and would love to purchase them. Unfortunately, as I live in England I dont seem to be able to get hold of them here. Does anyone know a company online that will ship them to England?
Thanks
Jayne Maill
England
Pingback: Purse Patterns, Tote Bag Patterns, Quilting and Sewing Patterns from Joan Hawley of Lazy Girl Designs
I can’t seem to find how or where to purchase this product. Also, what are the finished size of the small/large yo-yo makers? Are they available retail? Website only?
Thank you,
Connie Legge
– – – – –
Hi Connie,
Try Clover’s website here: http://www.clover-usa.com/catalog/16.html
Joan
Pingback: Create A Perfect Yo-Yo Every Time · Quilting @ CraftGossip
Hi ladies!
Some of you were inquiring where to purchase these wonderful little gadgets and just wanted to let you know that we handle them–and yes, we ship worldwide.
Send us an e-mail with your request and shipping address for a quote.
Contact us at info@myscrapbookparadise.com
I’ve always wondered how these gadgets were used. Thanks for the tutorial! You should do one on some of the other shapes.
I just bought a book at this web site for yo-yo ideas. The name of the book is “Yo-Yos and Fabric Flowers” from http://www.clotilde.com/
This book might inspire you.
These yo yo makers look like they would be a great idea. I have been using the old coffee can lid method. I think I will invest in some and see if it is as easy as it appears to be. Thanks for the great ideas.
Hello:
I have just met a lady who had a little yoyo maker and she sent to Fla. to get me one where she got hers. It is wonderful. She and I are making them as fast as we can and are looking for different ways to put our coverlets together.
These little gagets are WONDERFUL!!
I just bought one of these at AC Moore last week and can’t wait to have time to sit and make a slew of yo-yos! Thanks SO very much for your informative and easy to follow tutorial! My mind is swimming with ideas of how to add yo-yo accents to my life. Thanks again for your tutorial!
Pingback: B e n t e B’ s B l o g » Blog Archive » Søt sydd topp / Cute Tie Top
hello,
My girl friend and I were wondering how many yo yo do you need to make a quilt just with all yo yo like a twin or a king??
Kathleen
I like yo-yos and I know how to do them without the tool, but I never seem to make more than two or three at a time. I tried this tool and I made like 100 all at once. Clover makes the absolute best tools and I think I’m going to buy this in every size.
Pingback: How to make yo yo's - Hip Girl Boutique Free Hair Bow Instructions--Learn how to make hairbows and hair clips, FREE!
I am wondering where are the craft projects for the yo yo’s. Does anyone know of some new sites to visit? I am working on two quilts one is a large yo yo quilt with 899 yo yos on it and the other is goin to be a small quilt and another project is a yo yo centerpiece with my new last aneme on it. Have any ideas I would be greatly appreciative!
thanks!
🙂
Pingback: Eigenwys.be | Mijn top 10 wishlist
Pingback: Bente B`s blogg » Blog Archive » Søt sydd topp / Cute Tie Top
Pingback: The List « amy a la mode
Pingback: My Creative Space 3 « woollywotnots
Pingback: New gadgets to buy « Millie Moo’s Musings
Can these be made with any type of fabric? I’m thinking about gold lame or organza.
The tutorial is great.
Marta
I’ve made yoyo’s for years I make my own, don’t use yoyo maker. Have made 2 king size coverlets will soon be ready to assemble the 3rd. Would like to sell them as I plan to make more, don’t quite know how to go about it. I am pretty much a shut-in with alot of time on my hands. Can anyone help me
Thanks Carol
so much easier to make yo yos the original way… and more frugal too. we don’t need so many gadgets.
Do you wash the fabric before making the Yo-Yo’s??
Pingback: Yo Yo's - I'm in Love! - Splitcoaststampers.com
What a genius invention! I had no idea such a thing existed.
I love these disk-I several different sizes always always always a perfert yo yo we even have the young (ages 8-12) girls in our church making them!!!!!!!!
HI, I love your site, thank you, very much for your tips, and for this in special, I buy this disk in long time away but a never used because I don´t konw how….
thank you again Esther from Panama, C. A.
Pingback: friday favorites 9.2.11 |
Pingback: Lazy Girl | Blog » Nancy Zieman Tablet Keeper: Paper Pad Keeper With Pen Holder
Pingback: {make it} Having fun with Yo-Yos! – FabTalk - It's All About Fabric
Where can I order the yo yo make?
Pingback: Bouquet Pillow « Crowing Hens
Pingback: Bouquet Pillow « Crowing Hens
Pingback: Lazy Girl | Blog » Quilty Stocking Stuffers for Cyber Monday Shopping
Pingback: Lazy Girl | Blog » New Pattern: Yo Yo Cutie Pins are Pin-tastic!
Thank you Joan.
I love the tutorial you made for us. I took my yo yo makers to the hospital last year when I accompanied my sister as she waited for her husband to get his chemotherapy. I was trying to make a Santa’s head for a Christmas decoration.
Have a wonderful holiday!
WoW! It’s perfect! Congratulations 🙂
ilike to if there is i make yo yos and would thnlikth
thetoknowifthereisawebshowingcenterpiecepatternsforthem
Pingback: Friday Finds – Yo-Yo Maker Inspiration | Clover Needlecraft
Pingback: 100 Things Every Quilter Should Do | Quilty Pleasures Blog
I was so glad to find your site. I made yo yo’s when I was a child but that’s all I can remember about it. I got the notion to make a quilt/comforter for my bed and thought about how beautiful it would be with the yo yo’s on top of it. I’m also thinking about putting buttons on the yo yo’s if I can find my box of old buttons. I won’t buy that many buttons. Thanks so much for the Yo yo maker and how to make them. I will be looking at your site since I found it.
Pingback: Cómo hacer un yo-yo de tela reciclada | El blog de trapillo.com
Pingback: Life Is Like a Bowl of Cherries (Or Why My Five Year Old is Still Up at 9:17 PM) | chica and bubba
I own a yo yo maker and made many years ago. Lost the directions
and found your site. You say you can print these directions but I cannot
find where/how you do this. Think the directions are excellent but
would like a copy of my own. Please advise.
Thank you. I have recently purchased the yo yo maker but found the instructions that came with it rather confusing. Having read yours I am now looking forward to having another go as they are much easier to follow.
Pingback: 100 Things Every Quilter Should Do in Their Lifetime | The Quilted Edge
I am dreaming of making a king sized “yoyo” quilt while I am recovering from major back surgery. Recovery time will be at least 6-12 months and thought this would help to pass away the time. My question is: how many extra large yoyo’s will it take to make a king sized quilt. HELP! Thanks in advance for your assistance. And happy holidays to all who will be having fun making their holiday gifts… Lin
So, you are showing the yo yo with a hole in the middle-which I think looks neater than mine cause the tighter I pull the yo to closed-it kind of puckers. It goes askew if that makes any sense
Hi Ladies, I noticed that some of you are wondering how to use these pretty little things. I have a book called SIMPLE GRACES Charming Quilts and Companion Projects by KIM DIEHL who is always fantastic, and I am at present making a couple of her quilts, one called WELCOME WAGON YO YO QUILT, and it is gorgeous, have a ook I am sure the quilters in the group will agree.
Very nice tutorial. Even though I had figured out how to use the gadget, the instructions on the packaging were terrible. This was a nice refresher and a great tutorial for a beginner. Thanks!
I have been doing yo yo free hand. This would make things much easier and faster. Maybe I will get my quilt finished!
I love making these with the Clover forms. I did find that finishing them was a little difficult so now after I have gathered and shaped them I take the needle and put it through to the back and make 2 tiny stitches to lock the thread and then bury the thread. You don’t normally see the back of a yoyo. Love them,
Me again! Another tip for making yoyos – use single strand hand quilting thread. It’s light weight but very strong. No more breaking thread when pulling to gather. I love yoyos!
Hi , i want purchase a yo yo maker the original size numbers : 8700, 8701, 8702, 8703 ,you can help me? I live in Brazil. Excuse my poor english. tanks.
Hello,
I have these yoyo disks in several sizes and I love them., so easy to make.
Great for using up extras quilt squares and of course fabric scraps.
I sew small scraps together like a little random quilt and make yoyo..
Very nice tutorial.
I am so excited to try this YoYo Christmas ornament. Thank You