Customize An Ensemble Part 2: Sassy Bag
Lazies, The Sassy Bag has become a trusted friend – as any purse should be! The beauty of the Sassy lies in it’s safety and usability, while being wrapped in beautiful fabrics to distract you from all that function and utility. One goal in customizing my designs, is to make the alterations and additions look like they are part of the original design and not stand out like a frilly toothpick atop a deli sandwich.

The Sassy is a small-ish bag designed to be worn across the body and hang at your side. The flap closure is engineered to close all by itself. The front expands as you add contents to the purse. Two inside pockets keep a few necessities in place and secure. An open back pocket offers convenience for grab-n-go little things. A padded shoulder strap offers comfort while you combat the maze of daily life. The Sassy is rugged gear with a Lazy lifestyle in mind. I feel well-equipped and prepared when wearing my Sassy.
Having said all of that, what could possibly be needed for this little gem?
Bigger Is Better
Sometimes you need a bigger Sassy to hold more for your daily expeditions to the wild that life offers. I increased the width of this Sassy by 1/2″. To do so, cut all of the pieces an extra 1/2″ in width.
I once tried to increase the size of the Sassy by 2″ in width and height – wow, what a disaster. As we saw with the Wonder Wallet, a more conservative increase goes a long way in adding to the capacity without losing the over all integrity of the design.
This 1/2″ increase in width will add a total of 1″ of space to the Sassy. That’s a generous and noticeable increase for this bag.
Flap Closure
The flap is already wider than the bag by design. Simply cut it 1/2″ wider than the pattern states and make as directed.
Pleated Front
The pleated front is still prepared the same way. The pleats are determined through a short series of folding this way and that. The pleat placement will be perfect using the same folding instructions. Keep the pleats the same size, too. The overall finished/pleated/elasticized, Velcro’d piece will be the same width as the other parts of the bag which were widened by the same half inch. Be sure to cut the elastic 1/2″ longer as well.
Inside Pockets
The Sassy has two inside pockets, one a bit wider than the other. Great for sunglasses, cell phone, pens, etc. You have an extra half inch of play – divide the pockets as you see fit.
Shoulder Strap
With a slightly larger Sassy, I felt the shoulder strap might benefit from being a little beefier for extra comfort. I cut the batting strip 1/4″ wider and I cut the fabric 1/2″ wider. These are the widths for the Miranda Day Bag fabric handles. Follow the instructions in the Sassy Bag pattern for making and attaching the shoulder strap. For a finishing touch after topstitching along both edges of the shoulder strap, topstitch along the center as well.
Adding A Zip Pocket
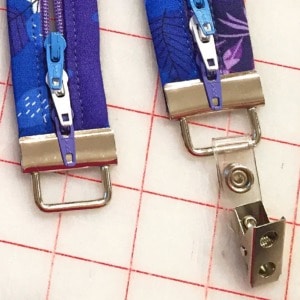
A little extra security in the way of a zippered pocket is a nice option to add to the Sassy Bag. I used the directions to make the front of a Runaround Bag (LGD111) to add a zippered pocket to the back of this Sassy. Again, we widened the purse, so the zippered component needs to be the same width. I also want the zipper to be above the back pocket for easy access.

I cut the piece above the zipper at 4″ by the width of the Sassy and followed the zipper instructions in the Runaround Bag pattern. I cut the fabric for below the zipper to be longer than I thought I’d need, then trimmed it to length during final assembly.
For final assembly stack the back pocket on top of the zippered piece and treat them as the back piece of the Sassy. Reminder – pull that zipper tab to the center before stitching all of the layers together.
Velcro
I used the Fusion fusible Velcro for this project. I wet the area, then let it dry, to help the Velcro adhere better.
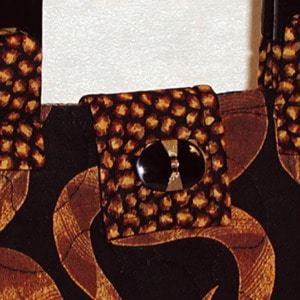
Decorating
I used fabric glue and a frog closure to decorate the flap after the project was finished.
Next week we explore the Miranda Day Bag.
Enjoy!
Joan


I love it!!! I really like the idea of the zipper and the frog embellishment. Can’t wait to try it.
Thanks for the updates and the new ideas!
Carol
I like it…..says she who is yet to make one sassy while her friend has given several as presents……but I like the extra size idea.
I am all for abundance………vbg.
Joan, this is such a darling bag. I’m looking forward to making it. Thank you for all the great ideas! You are always an inspiration
I love the fabric combo that you chose for this bag. My only problem is the frog, gets lost. Maybe a different color would show up better. Anyway I want to try this bag, after seeing the one that you made.
Hi Joan, How come we are unable to print off the directions you give us to add to the bags
Thank you Ruby
Hi Ruby, To print anything from the internet, go to ‘File’ at the top of your screen. Then to ‘Print’ or ‘Print Preview’ and you’ll be able to print the web page. I usually use ‘Print Preview’ so I can see how many pages and what it will look like before printing. You can also copy/paste to an email or Word document and print from there. Give it a try! Joan
I love my Sassy bag for travelling. I have to take both a briefcase and a carry-on bag when I travel – a purse would be a third item and the airlines only allow two. I take a Sassy bag with a Wonder Wallet, and just fold it up inside my briefcase when going through security and getting on the plane. When I reach my destination, out comes the Sassy bag!
I’ve made at least 4 Sassy bags. I’m going to make my next one with the zippered security pocket you show – that’s a good idea.
I use the free doPDF ( http://www.dopdf.com ) program to print instructions or other things I save from the net.
In this case I highlighted just the instruction portion, clicked file, print, click ‘selection’ and then print. In the next box, navigate to where you want to store it, at this point I usually change the name to reflect the actual info in the pdf and click save. So much easier than copying and pasting.
If you are printing a whole page, you don’t have to click ‘selection’.
Very thoughtfully done, beautiful fabrics–thank you. IT’S a treat to see a project so well described in all ITS parts. (Just a little something for you in return.)
Great colors now that it is going into fall/winter. As another idea that I work into my Sassay bag is to add a loop to the inside above the inner pocket. Living in Las Vegas I get many bunge cords for the players cards. I remove the bungee and am left with the plastic “clip” that opens and closes and adds security to carrying your keys. The loop is made just as you would make double fold binding. stitch it on the folded side and the open side then attach as you would a handle so it is stitched 2x and neat!
I took my first Sassy with me to Disneyland and Las Vegas this summer. It was so easy and convenient. Now I need to make more for my travel buddies! I like the bigger size option, too.
Here’s my shop sample of the Runaround Bag using Studio E fabrics. Lovin it!
http://inlinethumb20.webshots.com/45267/2203141970046404172S600x600Q85.jpg
[URL=http://home-and-garden.webshots.com/photo/2203141970046404172iYMLNx][IMG]http://inlinethumb20.webshots.com/45267/2203141970046404172S600x600Q85.jpg[/IMG][/URL]
I have the attempted to make the Sassy Bag but have faultered on the pleating/elastic instructions. Do you have some pictures that would make the instructions easier to understand for me to achieve a better result than the mess I ended up with? Am I the only one who got stuck at this point!? Sharon.
Hi Sharon, Help is on the way! We have a video demo of the Sassy Bag here: http://www.lazygirldesigns.com/community/media.php
I would like to know how can I obtain a pattern for this bag. Please let me know if it’s and e pattern, that is very convenient for me. Thank you