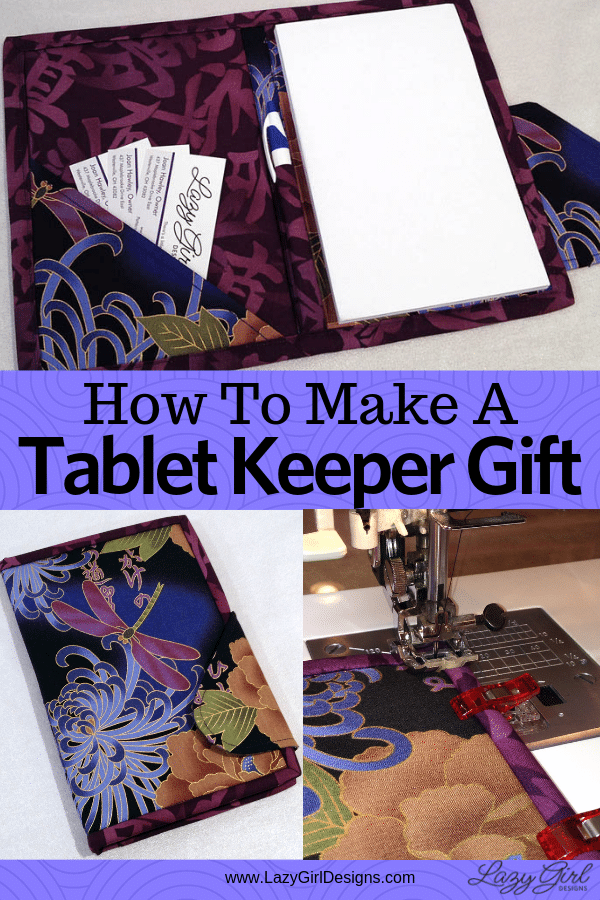
Make a Tablet or Paper Pad Keeper With Pen Holder
Lazies, Stay organized in style! You can make this gorgeous fabric keeper for a pad of paper, or an electronic tablet. The keeper also has a little pocket and pen holder, too. This quick and easy gift looks great in fabrics for guy gifts or gifts for her.
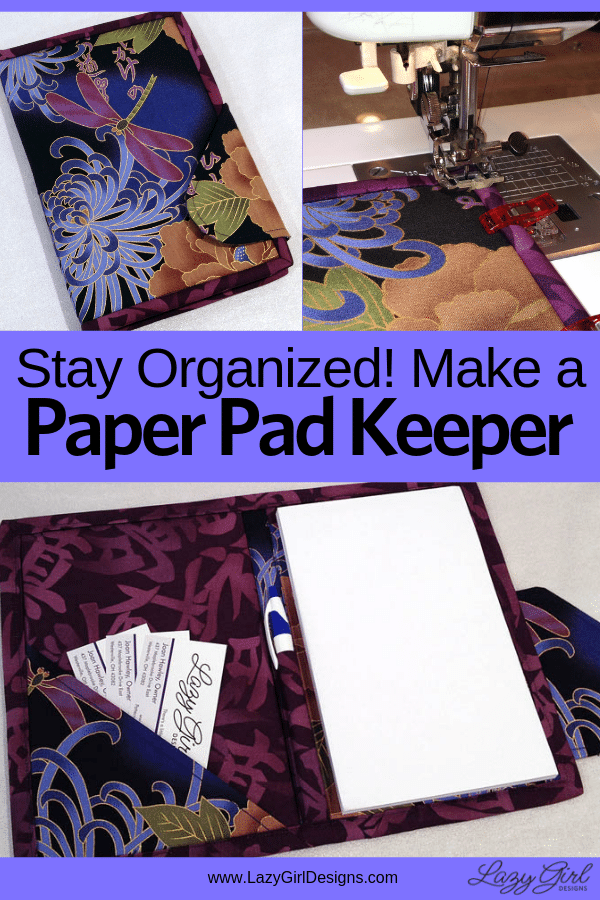
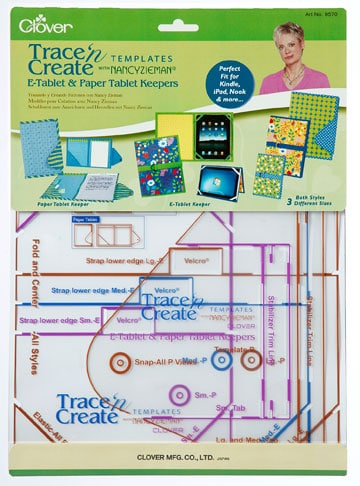
Nancy Zieman’s Tablet Keeper template will make keepers for e-tablets/eReaders like an iPad or paper pads in three sizes. I made three of these great note keepers for gifts.
This keeper will fit perfectly inside our Candice bag. Our new Fat Pocket technique for the inside Candice pocket will easily accommodate these keepers. Consider making one to coordinate with your next bag.
I am forever carrying a small pad of paper with me. But it’s usually a challenge to keep it looking nice. So I used Nancy’s Template to work with my favorite 5″ x 8″ scratch pads so my paper and I can travel in style. I love these pads and have them all over the house, office and studio. (Office Max ‘Scratch Pads’, 12 pads, 100 sheets, $15.)
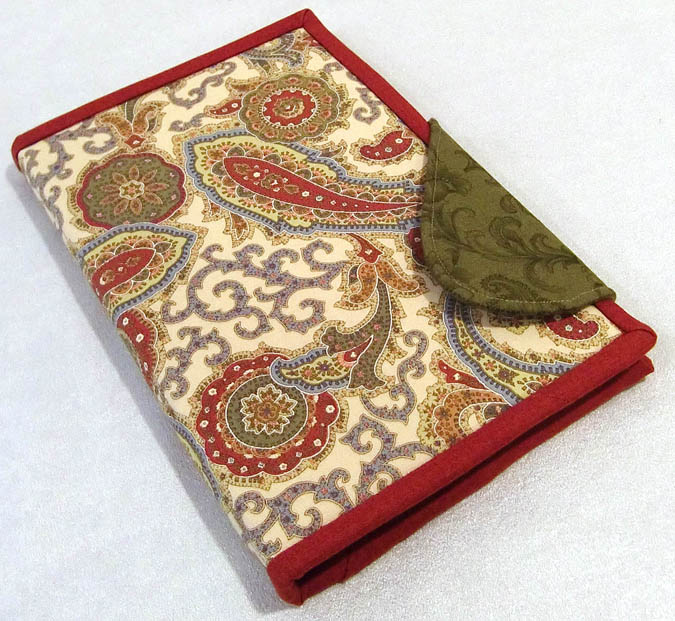
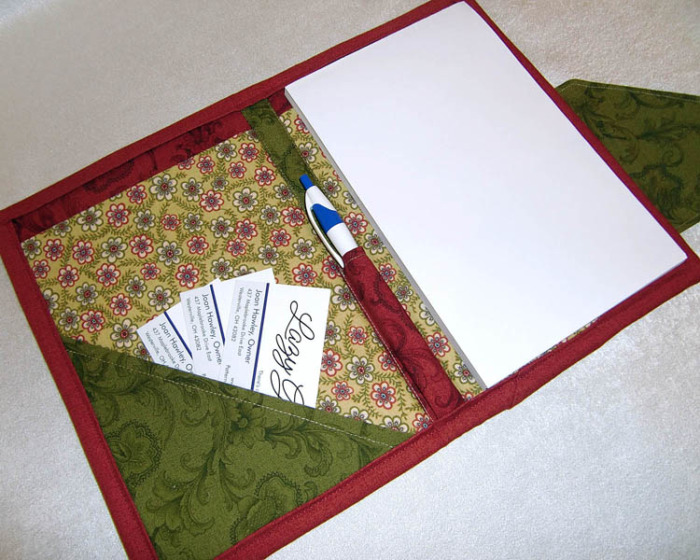
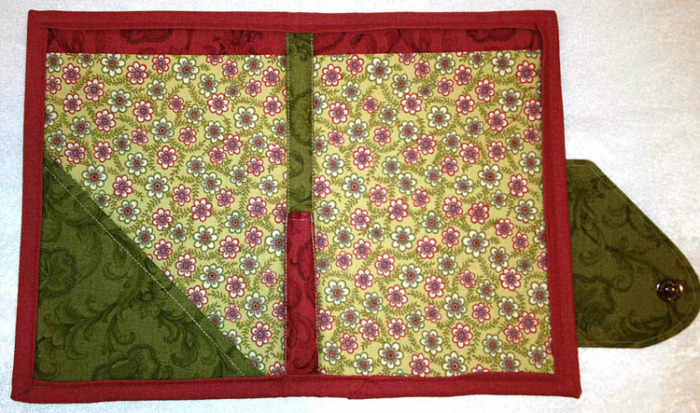
I have been hanging on to this bundle of Moda fat quarters, waiting for the perfect project. I made this for my Mom. She’ll love these fabrics.
I made a few minor adjustments. I made the green triangular pocket a bit larger. After test-fitting the paper pad and before the final step of adding the binding, I noticed there was room for a pen along the spine. Adding a pen holder was easy.
Add a Simple Pen Holder to Your Notebook
I added a pen pocket on the inside spine. Because the green spine fabric is simply topstitched in place, adding another layer of fabric here was quite easy. Simply topstitch another layer of folded fabric on top of the spine.
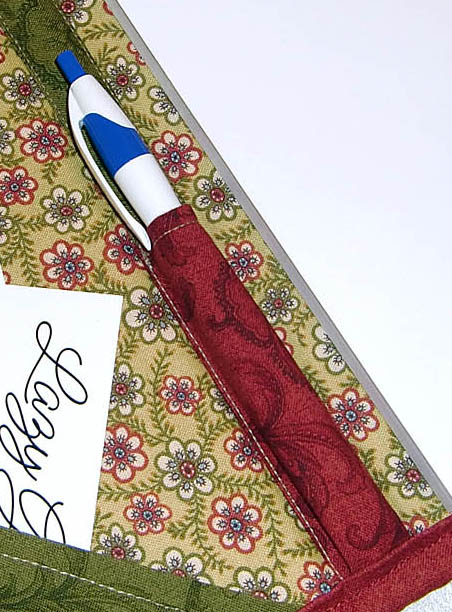
Cut a strip 1.75″ x 8″. Fold 1/4″ of long edges to wrong side and press. Fold in half to measure 4″, topstitch along fold. Place on top of spine, match raw edges to bottom. Stitch in place along edges where shown on top of spine. Manage the layers to a nice pleat at the bottom and topstitch to secure.
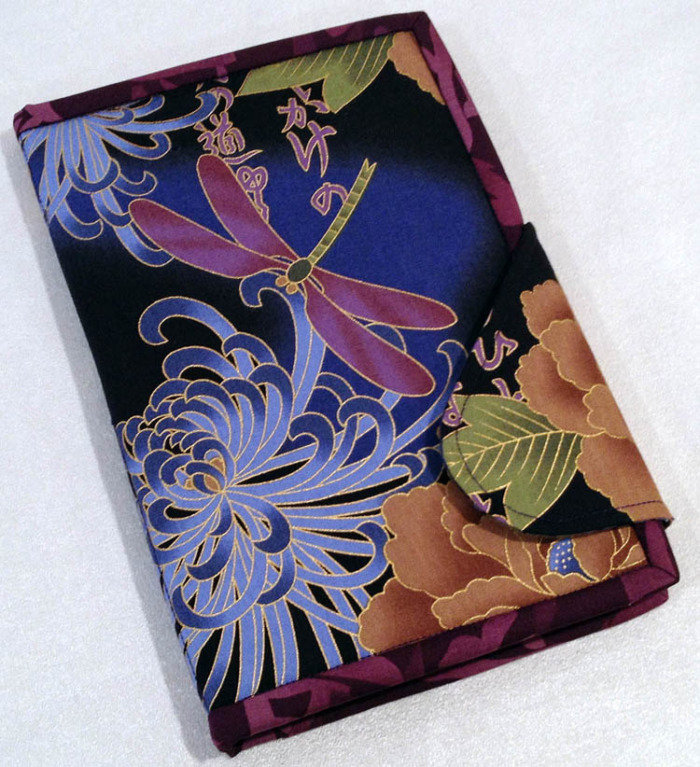
I didn’t stop there, I grabbed some fantastic Kona fabrics and fussy cut to feature the dragonfly on these two keepers.
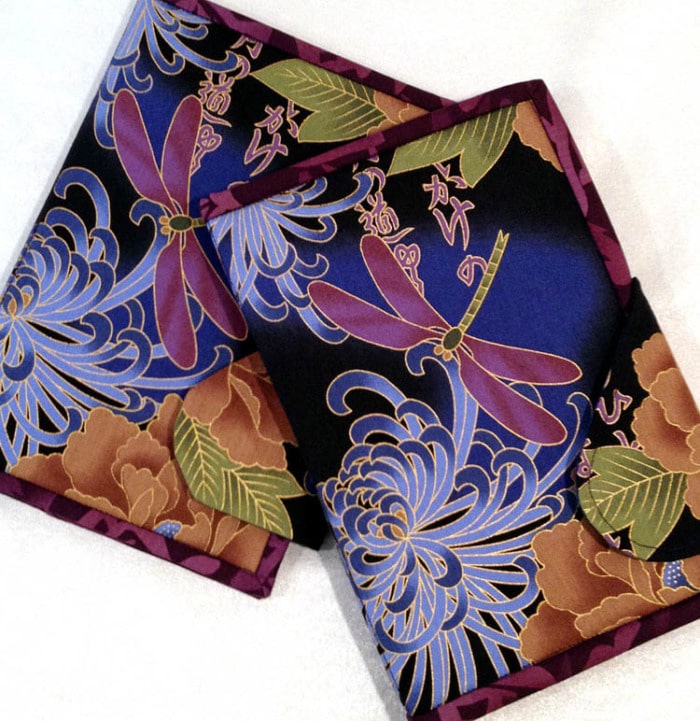
I worked with just two fabrics, instead of the three called for in the Template instructions. That meant that the flap closure blended a bit more with the cover.

I made one other modification, making the left lining from a single piece of fabric rather than two pieces. That meant a little more measuring and planning on my part.

I used a Clover magnetic snap for the closure. Velcro would work just as well.
Note: This post contains affiliate links. I make a commission when you buy something through those links.
Use Sewing Clips Instead of Pins
I used Clover Wonder Clips sewing clips instead of pins on this project.

The clips have a red piece and a clear piece. The clear is a flat piece of plastic with markings that relate to the width of your binding.

The red part is curved to accommodate the bulk of the binding. So, between the ingenious flat side and the curved red side, your project lays flat against the bed of your machine while you sew. Simply remove the clips as you approach the needle.

To use, simply attach your binding as usual. Fold binding to the back and clip.

Notice that the clips go just to the edge of the binding. That helps ensure the same amount of binding is turned under.

Simply stitch in the ditch by machine, removing clips as you go. Or stitch binding in place by hand.

Use Sewing Clips For Bag Projects and Binding
- Holding handles in place on a bag project
- Keeping layers together while stitching seams
- Working with laminates or leathers that should not be pinned
The templates were easy to work with, accurate and gave me confidence. The templates include marks for perfect placement of the snap, spine, etc. Having three sizes on the template with markings for all of these things means less measuring and figuring on my part.
Since all cuts are rectangular/square, this project would be easy to customize for any size fit. I used decor bond med/heavy interfacing, Pellon fusible fleece and Nancy’s tablet shapers for structure.
Buy Now
Get the Table Keeper
Resources
Nancy has a great video demo online here: Tablet Keeper Video
Nancy offers a nice step-by-step overview of the project on her blog here: Tablet Keeper Blog Post
See what other bloggers did with their project, list below my name at end of post.
That’s Pinterest-ing!
Join me on Pinterest here, remember to ‘Follow’ me there, and pin this post and pics to your Pinterest boards to save this idea.
New to our blog? Subscribe to get emails so you don’t miss a juicy morsel.
Like and share this post with your stitchy friends.
Join me in the Lazy Girl community on Facebook here: Facebook Lazy Girl
Enjoy!
Joan
Facebook Lazy Girl
Pinterest Joan Hawley
Instagram @JoanHawley
Twitter LazyGirlJoan
Here are a few stops on the blog tour:
Nancy Zieman http://www.nancyzieman.com/blog
Amy Ellis http://amyscreativeside.com/
Vicki Christensen http://www.sewinspiredblog.com/
Joan Hawley http://www.lazygirldesigns.com/blog/
Eileen Roche http://dzgns.com/blog/
Julie Herman http://www.jaybirdquilts.com/
Natalia Bonner http://www.piecenquilt.blogspot.com/
Amy Webb http://www.amylouwhosews.com/
Allie Robertson http://thinkcrafts.com/
Clover Needlecraft provided the Tablet Keeper template set, strap interfacing, hardware, and tablet keeper shapers for this project.


I like this! I am thinking it could be modified for my coupon shopping……………..
I really like both of your covers, but that one with the dragonfly on it is out of this world! Beautiful job on both of them.
Really like this.
Great idea to use the dragonfly material. Trust Nancy to come up with templates. Thanks for letting us know about these.
Joan,
What great Paper-tablet Keepers! The next I make I’ll be adding the pen holder. You’re very clever! Thanks for being part of the blog tour.
Wow. What a super idea. I have an iPad (2 actually) and one has no cover yet. I think I need to make a pretty “home” for it. Thanks for sharing!!
Funny, I just bought these templates yesterday on ebay. Thanks for the tutorial!
Ordered my template set on Friday. Can’t wait to try. Thanks for the pen holder idea. I’ve made my own paper and e keepers, but will be nice to have these templates.
Love the e readeer and notepad covers
I love the colors you used for the note book holders. So cute and would make nice gifts for friends.
Very nice! Love the addition for the pen; I’ll be using that for sure!
I really like your choice of fabrics! They are beautiful. This is perfect for keeping your notepads from getting “dog ears”.
so glad to hear from you,,and glad to see you have your website,,love what I see and look forward to hear about quilting and embroidery,,Yes I am a Quiltaholic,,you take care and have a great day HUGS Cheers angeljeanne (jeanne)
Really like the modification to have the fussy cut dragonfly fabric in the second keeper project – beautiful
Beautiful covers!
WOW, I love your choice of fabrics, especially the batik one, awesome job!
What great looking tablet keepers! Adding this template set to my “wish list” — can’t wait to create some of my own!
I love these! I have a few of her templates but not this one. I also have a pattern for something like this tablet keeper but I love this design. Thanks for sharing – they are gorgeous!
These are so cute and handy, I must make one for myself.
Joan you always do such a great job and I love the Blog Tour idea.
The pen idea rocks can’t believe it wasn’t in the instructions already.
My only worry would be will those 4 little straps on the corners really
hold my IPAD securely so it doesn’t fly out of there. Not as worried about
paper but my expensive electronic that is another matter.
Love this idea! My daughter and I both have a Kindle. I see a new cover in our future!
Love your tablet keeper. I especially like the dragonfly fabric. So pretty. I need to make one for my Kindle. Thanks for the info!
I am loving this tablet keeper. I used another pattern to make a cover for my daughter’s nook, but this one is so much nicer. She might just end up with two!!
Beautiful designs, I like the corner for papers, and the pen holder.
Those tablet covers are both very pretty! I’m partial to the Asian fabric one, though. Love your LazyGirl patterns.
WOW…I Love it !
I got an ipad for my birthdayy and a cover would be great! not to mention the rotary cutter which I deperately need!
Crossing my fingers b!!
Liz
These are so pretty! I love the fabrics for your “scratch pad”. I have a nice, but ugly little notebook I need to cover, but haven’t found the right pattern yet. This looks cool!
I have a 5-year One Line a Day diary that I got for Christmas that this would be perfect for!
I do have to get me one of these! What wonderful gifts they would make!
I want to make one for my Nook and now I think I will make some note holders with the pen inside. Loved the dragonfly one. Just beautiful. Thanks
I love, love, love the dragonfly one. I always carry a small notebook in my purse and am now excited to make a holder for it. The pen modification is a great idea. I can never find my pen when I need it. Thanks
Thanks for your suggestion to use the same fabric for the flap and the cover. I really liked the way that looked and will probably do that when I make mine.
I love yours. This is probably what I’d use it for as I don’t have any of the new gadgets. Thanks!
I am a single mom and qui.ting is available to me when the buget allows and this would be a great gift for me otherwise probably unable to have such items.
Really looking forward to seeing this pattern come to stores near me. I have an e-reader without a cover. Plus I love to use tablets all the time for meetings so this would cover them and they would look pretty.
I loved your choice of using the two colors so your flap blended in. It was great. Good job.
Love the colours for the one with the dragonfly!! Beautiful!!
Magnificent tablet keeper!! The dragonfly fabric certainly puts it over the top. I would love to know what fabric you used as my sister is a dragonfly person and I would love to surprise her!
Love, Love, Love all your patterns and Lazy ideas!
wow, love the Kona dragonfly fabric for this project. Awesome job, now off to see more of your lovely creations.
Your tablet keepers are gorgeous and you did a great job. I’m going to order this template and actually use it! The tablet shapers are a little expensive–is there anything else you could suggest? I’m not too lazy, but a little cheap!
Pingback: Lazy Girl | Blog » Product Review and Giveaway: Wonder Clips from Clover
Love the project, love the fabric, love the clips!
a group of us made something similar a couple years ago but i must admite i like this one better.
Wow! Love this!
Love your paisley cover!! Great project!
Wow! The dragonflies are wonderful. I’d look for that fabric. Thanks for showing us.
I love your fabrics and love your notebook holder. I am a paisley and dragonfly nut!! You had me from the first picture. So Beautiful. Thanks for sharing.
Hi Joan,
Can you please let me/us know the name of the purple/blue Kona Bay fabric with dragonflies you used for the tablet? It is absolutely gorgeous!!
How nice it was to find this pattern! I was thankful for Ms. Zieman’s gift to the seamstresses whose life she wonderfully touched. Having cancer survivors in our family, her Nov 2017 passing touched our hearts, as did her courageous journey, battles, faith, and many years of giving.
These are awesome! I have a few of her templates, but not this one. In addition to this pattern, I also have another design for this tablet keeper. Thank you for sharing – these are gorgeous!