Free Tutorial: Add a Water Bottle Pocket to Your Favorite Bag
Lazies, On these horribly hot days of summer, I make sure I tuck a bottle of water in my purse when I head out the door. I didn’t used to be like this. I think it started after a trip to Las Vegas nine years ago where I learned I had to be my own camel and pack a hump full of water. I’ve never understood why it’s so hard to get a drink of water in the desert…oh, wait a second, scratch that. I guess I should have thought that through before I started complaining.

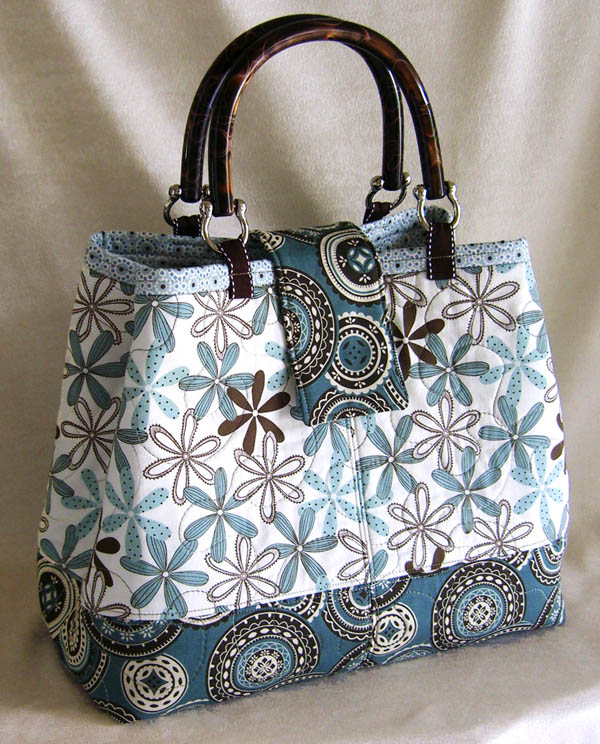
Above is a view inside my Miranda Day Bag (LGD123). I added a water bottle pocket near the side seam. This pocket gets used all the time. It works for corralling anything from my stainless steel water bottle or travel mug to food and snack-i-poos.
I’ve included instructions and notes for adding the pocket during construction, after construction, and even an advanced Lazy approach using only the existing pockets during construction.
The Water Bottle Pocket
Our goal is to add a finished strip of fabric that goes across the bag interior, effectively creating a pocket to go around your water bottle. The strip will attach to the existing pockets with Velcro. To accommodate the bulk of the bottle, the bottom of the strip is free from the bottom of the bag, unlike the side pockets which are sewn in place at their bottom edge. Use this technique to add a water bottle pocket to many of our designs during or after construction. See which ones later. When not in use, I simply push the pocket against the inside of the bag where it rests comfortably out of the way.
Let’s take a quick look a the pocket without the bottle. Here we can see the extra strip of fabric situated in front of two small pockets near the side seam.

Materials Needed
– 11″ of Velcro (Fusible Fusion Velcro works best. Sew-in Velcro only works well if adding pocket during construction)
– Fabric strip for pocket, approx 12″ x 8″
– Bag in need of a water bottle pocket.
– Optional: fusible interfacing just a bit smaller than the folded stitched pocket in the first picture below.
Make the Pocket
To start, cut a strip of fabric the same height as the inside pocket fabric so everything is all matchy-poo. For Miranda as shown here, cut the strip 12″ high x 8″ wide (10″ x 8″ for Margo, Mini Miranda and Claire). We need to finish the raw edges and add some Velcro, simple as that.
Fold the fabric right sides together and stitch the 8″ edge at the bottom, making a tube. Optional: for more stability, cut and add a piece of fusible interfacing just smaller than 6″ x 6″.

Turn right sides out and press. Topstitch along the folded edge.

Fold over 1/2″ – 3/4″ of the raw side edges and press. Optional, stitch along folds to hold in place.

Cut the Velcro to just a little shorter than the height of the pocket. Fuse rough half of Velcro on top of the raw edges. Stitch in place if using sew-in Velcro.

Add Velcro to Bag
Ideally, this is most convenient to do during the construction of your project. But it’s still pretty simple to add after the bag is done using fusible Fusion Velcro.
During Construction
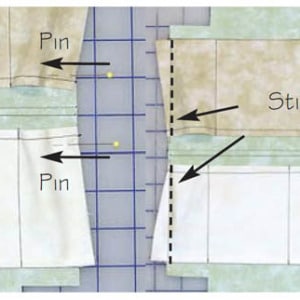
Attach the soft half of the Velcro to the inside pockets, about 2″ from the side edges. For those of you with any of my patterns that attach inside pockets in this manner, check the directions for attaching inside pockets, and place the Velcro near the first pocket separation or about 2″ from the side edge. The pocket separation is stitched through the lining which will help anchor your water bottle pocket.
Here’s a view during construction. If stitching in place, you can stitch through all layers. You can even stitch those little pockets shut a the top for better stability if you don’t need them. But I like to keep those little pockets functional so I fuse the Velcro in place.

Completed Bag
Here’s a view of the bag when it is done and turned lining-side out. If you are adding the pocket to a finished bag, start here. Simply fuse the soft half of the Velcro about 4″ apart, on top of the pockets.

Then simply put your pocket in place by lining up the Velcro. Having Velcro for the full length along the sides will make this pocket stay in place.

When you turn your bag right sides out, the water bottle pocket is ready to go.

Advanced Lazy Option
For the more advanced Lazy Girl, skip the extra pocket and Velcro entirely and simply don’t sew the last few inches of inside pocket panels to the bottom to the lining toward one side seam. When finishing that side seam, instead of sewing both pocket panel ends and lining fabric layers together in one seam as shown in my patterns, simply sew those loose ends of the pockets to each other and finish their raw edges. Then sew the lining side seam without the pocket panels. You’ll sacrifice the two small pockets near the side seam, but your water bottle pocket will be permanent and done!
Use this technique with our designs (see our designs here):
– Margo Handbag (you can still zip Margo closed with a bottle in place) Add the pocket near the opening of the zipper for quick access.
– Miranda Day Bag
– Whimsy Bag
– Gracie Handbag (although the flap closure creates a nice divide and helps harness tall bottles in place)
– Mini Miranda Bag
– Claire Handbag
– City Bag
What to Carry
Consider picking up a stainless steel bottle and filling it at home. I have a 27oz bottle by Klean Kanteen which I use all the time. Go wild and choose a great color. Here’s the one I have. And here’s my leak proof stainless steel thermal mug for hot tea and coffee, I choose the beautiful limey green.
Thanks to Harriet for writing in and asking for this project. I actually prepared this more than two years ago, but forgot to post it! Sorry Girls!
Enjoy!
Joan
[tags]free sewing project, tote pattern, purse pattern, sewing tutorial[/tags]


Joan: I love the idea but how about lining it with insulbrite or some type of insulation to keep the temp of the beverage cool. Judi
Dear Joan,
Thanks so much for the water pocket, and especially for encouraging us to use a stainless steel water bottle. I tried, but could not find any data on how much fossil fuel we waste on shipping clean water from place to place in a country where we all have access to clean water in our taps!! Theres information on how much plastic is wasted, (shocking,) but add to that all the fuel, and its pretty scary. If tap water tastes bad in your locality, a filter like Brita will make it taste sweet and pure, and practically free. No more lugging water from the grocery store, too!
glug, glug, glug,
Ophelia
Great idea Judi….where do you buy this insulbrite?
Hot here in Asheville, Laura
I live my life with one of two things by my side: My 27 oz Klean Kanteen with a sport cap or my Contigo leak-proof thermal mug. Both are the best I’ve ever found in their genre. I dare anyone to get a drip of fluid out of my Contigo without pushing the button!
Thanks for the directions for the water bottle pocket. I’ve had an in-progress Summer Tote in my sewing room for far longer than I’d like to admit, and several other Lazy patterns down there too. I need to get back to sewing more!
Thanks for this “better late than never” tip!! haha It’s a terrific one. I live at 10,000 ft and a water bottle is something that is always carried and rolling around in my purse.
Thanks again!
You can buy insulbrite at Joann’s fabric s or on line at Nancy’s notions.
great idea – my waterbottle (stainless steel) isn’t always water tight?? – this will definately solve my leaky problem!
I was wondering about using velcro if I am putting the pocket in “while I am constructing a/the bag”?
Not all water is created equal……our well water did not taste nice at all….we needed a watersoftener that made it safe and useable – but yucky to drink.. even Brita couldn’t help. We got bottled water (large bottles) from our local grocery store – who filtered their own tap, municipal water…. Environmentally ok..just cost $$$$$ – but sure tasted better than my own!!
I just have to remember to take it with me……this new idea sure will help with that!!
hugs
arlene
Dear Joan
Nice to hear I’m not the only one carrying water. I drink water all the time. I don’t retain my water. I carry a stainless steel bottle as I’m have an allergy to Plastic so never put in mouth. I carry mine in my bag allthe time. I don’t know what back i made but the large pocket hold mine. With the hande it loops over and hold in place.
Thank you, thank you! I had a few baby projects to finish and by the end of this week I should be ready to start on my Margo! Joan, I really appreciate you sharing this with us.
BTW, about 2 years ago Big Lots carried a nalgene bottle complete with samples of an instant drink mix super cheap, so I bought 3 and tossed the nutrasweet laden powdered drink samples. I LOVE these bottles. They are ‘one-hand’ operation (no twist top, no straw, just flip the top and guzzle). I can ‘drink and drive’ without fussing with the opening, they don’t leak, the circle that is part of the lid construction is perfect for finger carrying, and both bottle and top can be safely cleaned in the dishwasher. You can find them at
http://www.nalgene-outdoor.com/store/SearchResult.aspx?CategoryID=64
Thanks again, Joan!
What a great idea! I have a stainless steel bottle from Bed Bath & Beyond which holds a good amount. Also those stainless steel insulated mugs you show a link for are available at QVC.com – I have two. My husband uses one for iced tea every day. They are also good for hot drinks.
Love Lazy Bags!
Love this idea! Can’t wait to add it to the Miranda graduation gift I made. The ‘graduate’ and I have not been able to touch base with one another so now I can take her ‘present’ out of my car, add the water bottle pocket, put it back in the gift bag and she’ll have the ‘latest’ design!
I finished my Mini Miranda and everyone loves it! Now I’m working on Margo. I’m ‘experimenting’ with a Debbie Mumm patriotic border strip that I’ve had for probably 15 years! That will be pocket but not the back of the bag … I don’t want to have to ‘match’ those border prints.
It has been a little difficult to find a good ‘center’ of the design without decapitating poor ole Uncle Sam! We’ll see how this turns out.
Have a blessed week!
Peg
I am going to try as I carry water everywhere. I use the plastic bottles as I haven’t found one I like–I don’t like the ones that just kinda’ dribble into the mouth or you are to suck–ugh. I like to drink like from a glass. I will put one in my bag and then hope I remember to leave room.
Thanks
Great idea as the bottle is forever falling over in my bag – this way I don’t get everything soggy.
Awesome idea, Joan! And very easy to add to existing bags – I love it!
Well I almost had my Patriotic – 4th of July Margo completed! Tuesday night after being at work at 7:30 a.m and then straight to church for choir practice, I finally got home and began the next step of Margo at 9:30 p.m. I made my pockets and sewed them to Margo and realized one was a little bit crooked so … I ripped it out (which was really unnecessary) and resewed it. My friends call me the “Queen of Re-do”!
I noticed the pockets were about the same width of the bag but I sewed them on anyway. When I was done, the light bulb came on! I LOOKED AT THE INSTRUCTIONS and realized I had forgotten to cut the lining down to size after fusing interfacing! So … I sat down with trusty seam ripper in hand and ripped the pockets off, cut the lining down, cut the 2″ corners out and sewed the pockets back on and then went to bed!
i will be making 2 ,pockets both with velco, when one gets too wet I can pop a drier one in.Of course, when we are in LV in the summer, it will dry quicker than we can drink the water, but for New England summers it will keep the purse drier.
Pingback: Crafters Medley: 25 Neat-O Projects To Make (July 2010) : TipNut.com
@Laura: I purchase Insulbrite at my local Walmart. Just google it and you’ll find plenty of websites that sell it also.
The key piece of equipment that achieves this is called the inverter and racking
system. Without them, companies would not exist as customers are the
cornerstone to growing a successful business.
Treat your customer as an individual; people value sincerity.
Hi Joan. I purchased the Miranda bag a week ago and I am excited to get started. I had a thought on how to make fusible velcro without buying the fusible Velcro. I would take wunder under or heat and bond and attach it to both sides of the velcro backs and obviously I earn them to the side pocket. I don’t know anything about the fusible velcro and I know velcro can be expensive just by itself. I thought this might work and would love your opinion. I don’t see any problem with it and in fact it would probably hold up better. Thanks for all you do, Laura
Hi Laura, I think it might be good to test this before trying it on your Miranda bag. Test it on some scraps and see how it does.