How To Make Your Next Sewing Project Glow (In The Dark)
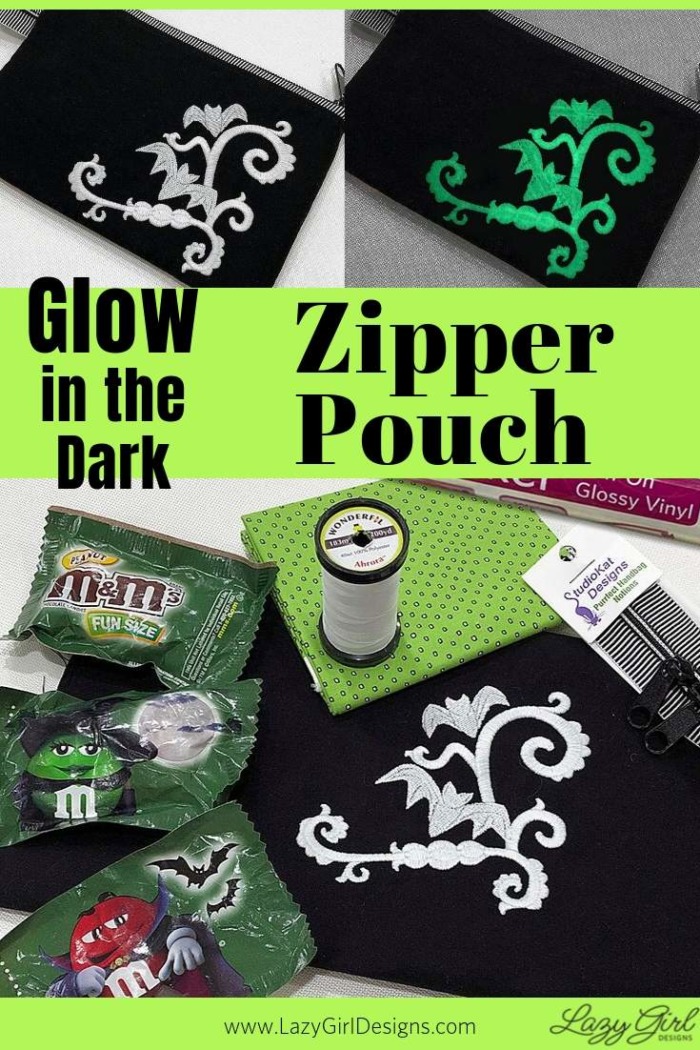
Make a glow in the dark candy wrapper zipper pouch with embroidery.
Lazies, I know we’re too old for trick or treat, or are we? I remember as a kid reviewing my candy haul when I got home. I’d lay all the candy out on the floor and start sorting – three of these, two of those, and some things I’d never heard of. After the night’s festivities of trading candy with my siblings and giving dad everything none of us wanted, the rest went into a big bowl where I could enjoy seeing all of those tiny packages with their fun wrappers. The wrappers were so cute that it was almost hard to rip them open to get to that sugary goodness.
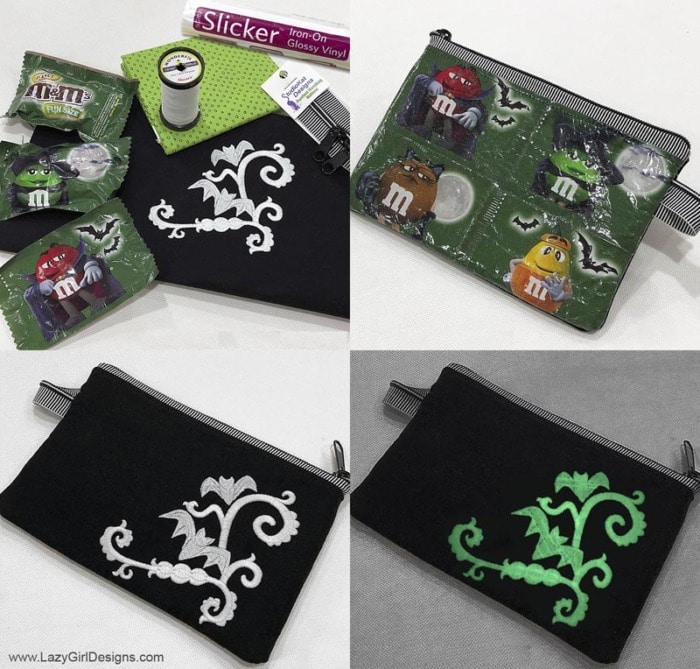
Supplies to make a glow-in-the-dark embroidery and candy wrapper zipper pouch.
Glow In The Dark Project Inspiration
Candy companies usually have exclusive wrapper designs for Halloween, and it’s the perfect opportunity to have a little sewing fun. This year I found glow-in-the-dark wrappers which I paired with glow-in-the-dark thread to make this cute zipper pouch. Grab your favorite pouch pattern and gather up your supplies for some spooky sewing this Halloween.
Note: This post contains affiliate links. I may earn a commission if you order through those links with no additional cost to you.
Supplies for Glow In The Dark Zipper Pouch
- Becca Bags pattern by Lazy Girl
- Slicker Iron-On Glossy Vinyl by Lazy Girl
- Gothic Bat Corner embroidery from Embrilliance
- Wonderfil Ahrora color AR01 Glow In The Dark thread
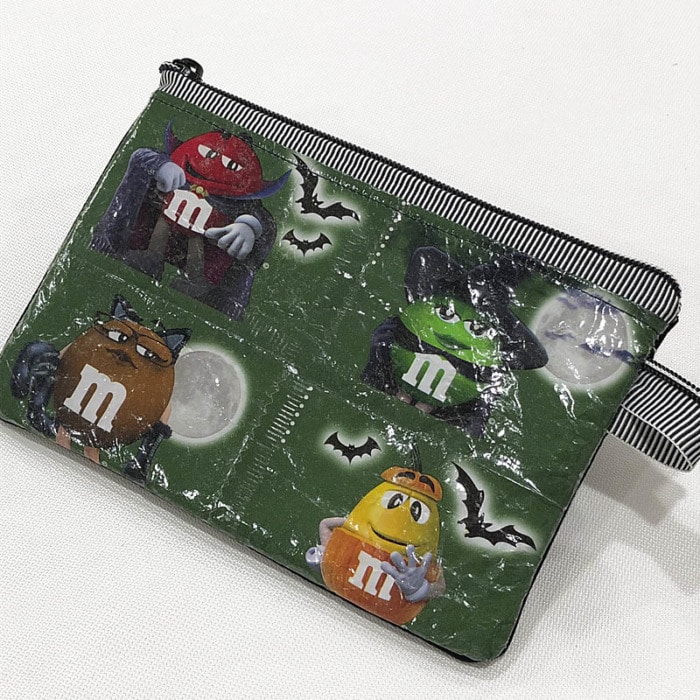
- Halloween candy with glow in the dark wrappers
- Black and white mini stripe zip, 22″ by StudioKat Designs
- Pixie Dots fabric in Lime color by QT Fabrics
- Fusible fleece as per the pattern
1. Stitch The Embroidery Design
Create your embroidery design, allowing for ample fabric around the stitching to construct the zipper pouch. Use glow in the dark thread such as Wonderfil Ahrora in Cream.
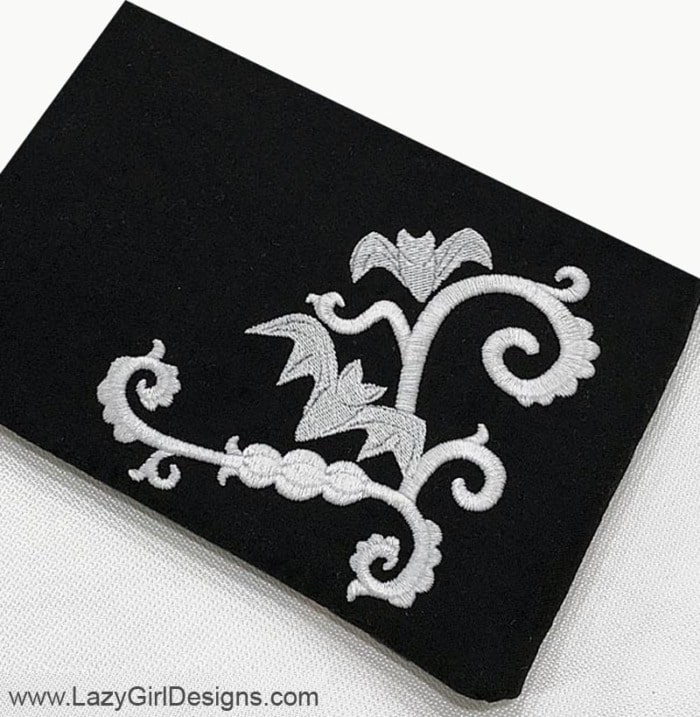
Choose a Halloween themed embroidery such as this Gothic Bat Corner design. Use glow in the dark thread.
The Gothic Bat Corner is perfect for this small design. The embroidery fills the corner nicely and adds elegance to this light-hearted project. The talented Lisa Shaw of Sew Bubbles stitched the embroidery for this bag project.
2. Prepare The Candy Wrappers
Select the candy wrappers you want to work with and empty those candy bags. I know, it’s a tough job, but somebody has to do it.
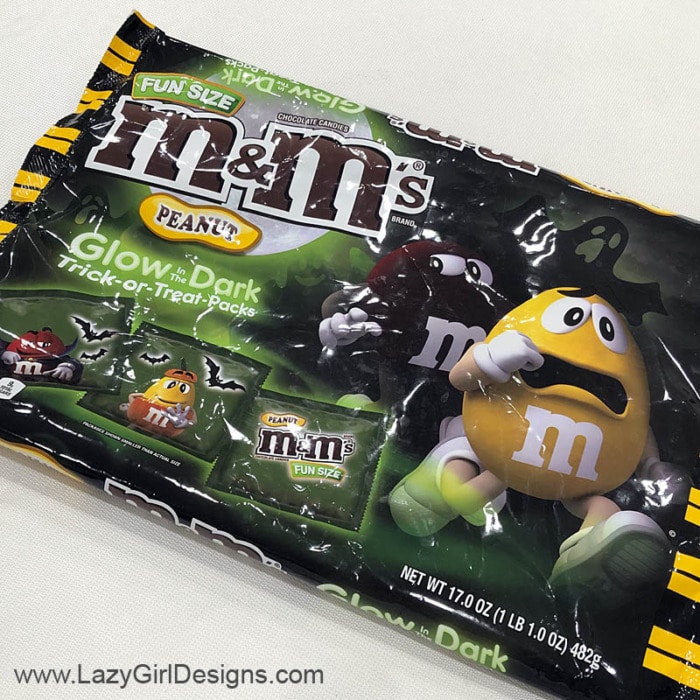
Glow in the dark candy wrappers are a perfect option for this fun Halloween zipper pouch.
Be careful not to rip the part of the wrapper you plan to use. Use scissors and cut a hole in the back of the package, then tear the back away, leaving the front intact. Test this method on one pack. If it doesn’t work well, cut the sealed ends of the wrapper off, leaving the good part in the middle.
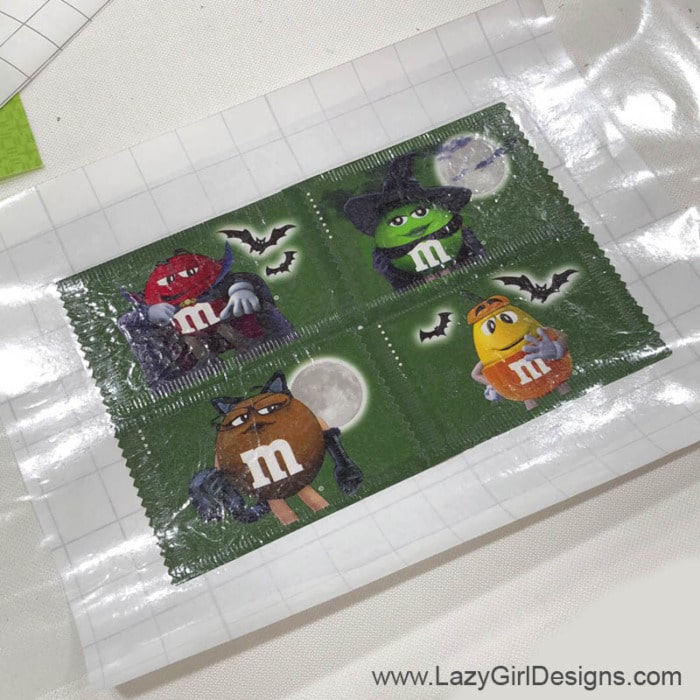
3. Position Wrappers on Slicker Vinyl
I love that the adhesive side of Slicker is a bit ‘sticky’ and serves as an extra hand here – bonus!
Peel the paper backing off of the Slicker Iron-On Glossy Vinyl and place it sticky side up on your work table. Use the grid on your mat as a guide and align the wrappers, face down, on the sticky side of Slicker. Overlap the edges of the wrappers, so there are no gaps.

Work with the Slicker Iron-On Glossy Vinyl sticky side up, then position the wrappers and smooth in place by hand. Be sure there are no gaps between wrappers.
Add wrappers one by one, smoothing each one into place by hand to work out any air bubbles. The stickiness of Slicker is enough to hold everything in place before fusing.
Use extra wrappers to make a few Candy Wrapper Key Fobs.
4. Fuse Slicker Vinyl to the Candy Wrappers
Use the paper backing as a press cloth and follow the manufacturer’s directions to fuse Slicker to the wrappers. Place an extra piece of paper under the wrappers to keep your pressing surface clean.
Use the paper backing from Slicker as a press cloth when fusing the vinyl in place. Always protect your pressing surface and place paper under the project when pressing.
For convenience, I usually fuse the whole thing to a piece of paper, then trim away the paper afterward.
See more Candy Wrapper Crafts projects at my Pinterest board.
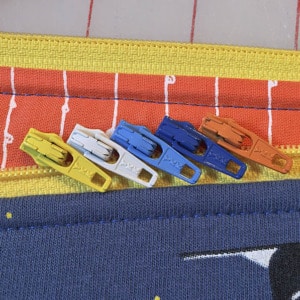
5. When To Use a Specialty Zipper
I know what you are thinking. This is a cool zipper, but you have no idea how or where to use it. I get it. I’m right there with you.
This is a purse zipper with both ends closed and two zipper pulls. Cut off the ends, unzip to take the pulls off, then use one half of the zipper and one pull for this project, as per the Becca Bag pattern. It’s like magic, and you are going to love the result.
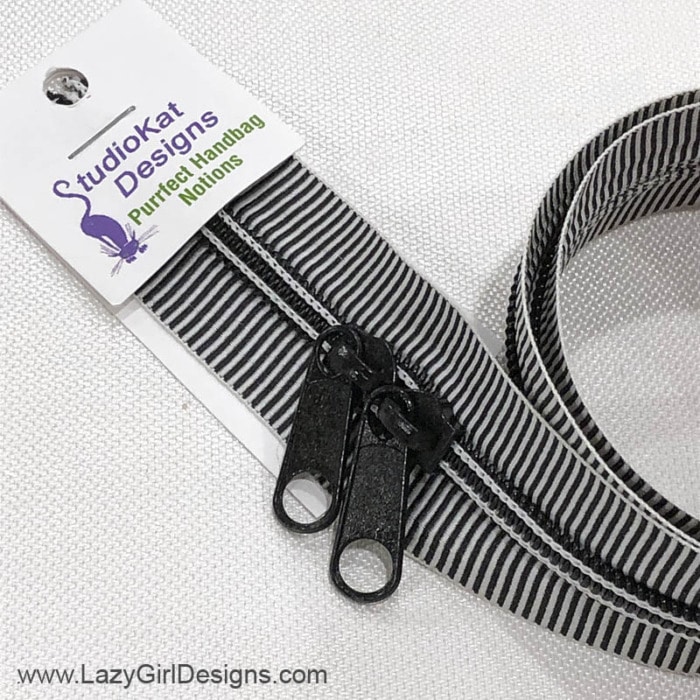
Cut this zipper apart and use one zipper pull with each half.
We have seen small black and white stripes in sewing projects before. It makes a beautiful detail, perhaps as binding on a quilt. That little alternating light/dark stripe is dynamic in small amounts. So this zipper will perform the same way as that quilt binding.
Some of that zipper width will end up in the seam allowance so that we won’t see the full amount of the stripes on the finished project. Grab your supplies, audition the players and see how this specialty zip looks when the project pieces cover some of it.
6. Combine Embroidery and Wrappers
Do your best to trim both the embroidery and wrappers to the same size to create each side of the Becca Bag.
Look how the black and white mini stripe of the zipper plays with the black and white elements of the candy wrappers and the embroidery. This dynamic specialty zipper pulls the whole project together. Without it, the front and back of this bag might not feel like they go together.
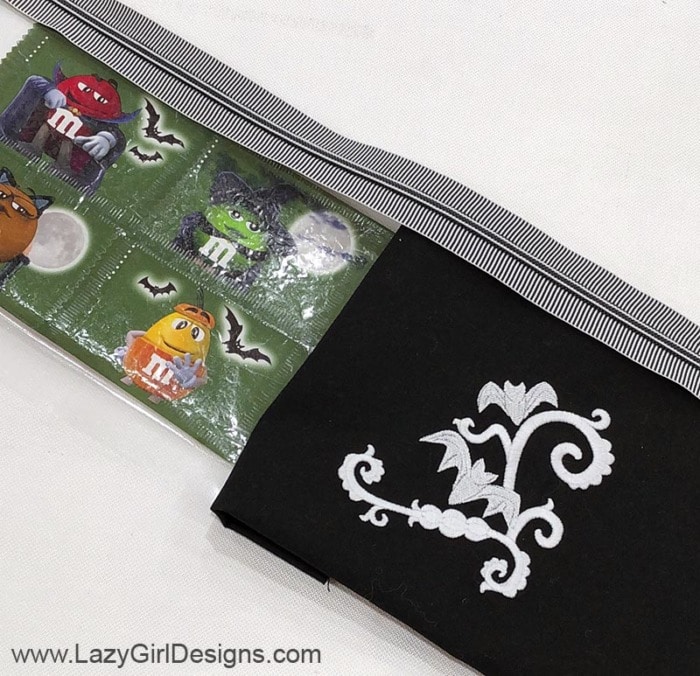
Arrange the zipper, embroidery, and candy wrappers to audition how they’ll look together.
Becca is constructed using a long rectangle that wraps from the front, around the side, and to the back. Sew the embroidery panel and wrapper panel together where they meet in the pic above to make one long panel.
7. Construct the Becca Bag
Because the embroidery and wrappers are not our traditional materials, fuse the fleece to the lining fabric instead of the outside fabric. Then construct Becca as per the pattern. I did not box the bottom corners of this project because it would have caused part of the candy wrapper design to end up on the bottom of the bag. Use the glow in the dark thread for topstitching.
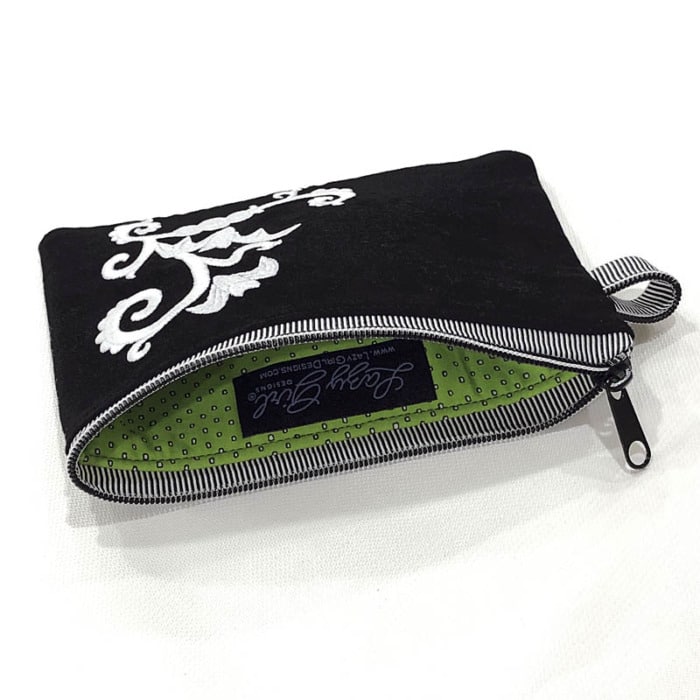
The lime green fabric with black and white polka dots truly is the perfect match for all of the elements of this fun bag.
Remember to use a bit of zipper length for the grab tab in the final side seam. It’s an easy detail that is as cute as can be.
8. Finishing Touches
Finish and turn the bag right side out. Doing so will cause some new wrinkles in the Slicker/wrapper side of the project. Use the Slicker paper backing as a press cloth and gently re-press that side of the project.
9. Activate the Glow!
Hold the glow in the dark elements up to a light to ‘charge’ them. Then turn the lights off or go into a dark room/space and watch the glow. Oooh, spooky!
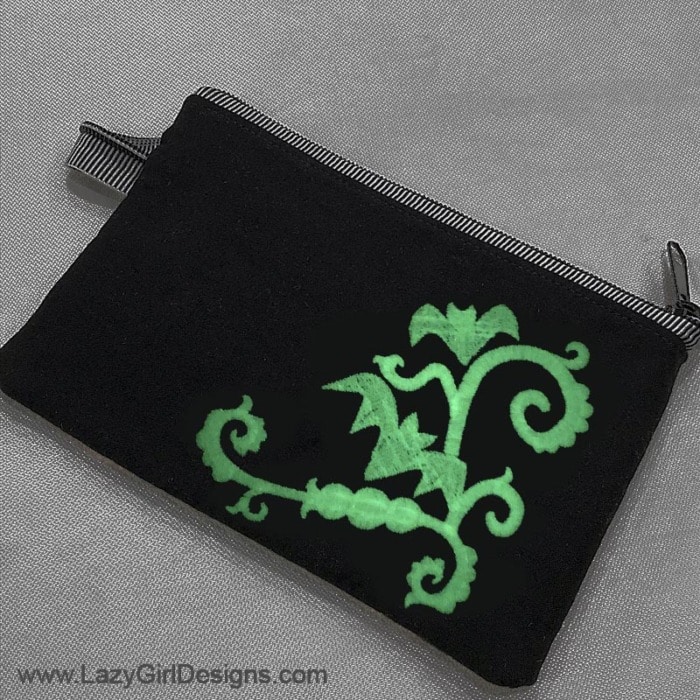
Hold the embroidery up to a light to charge the glow in the dark. Then turn off the lights and watch it glow!
The glow on these candy wrappers frames some of the elements such as the M’s, bats, and moon.
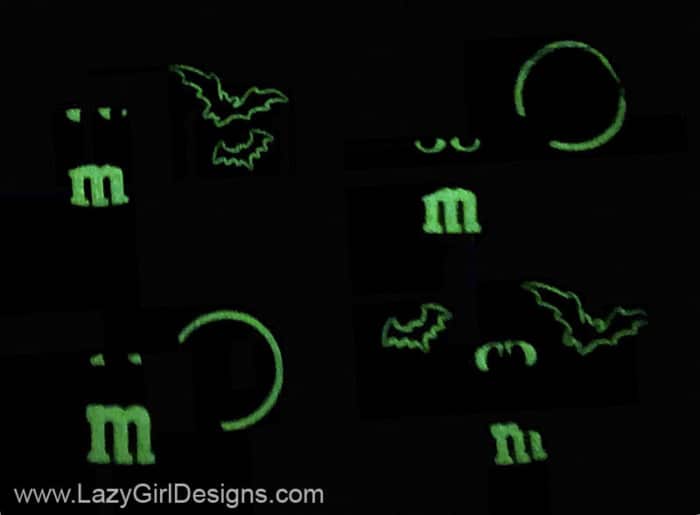
Hold the wrapper side up to the light to charge, then turn off the lights and watch it glow!
Carrying this fun, glow-in-the-dark zipper pouch is like bringing that big bowl of Halloween candy with me wherever I go.
Carry your Halloween candy favorites with you as this cute glow-in-the-dark zipper pouch.
That’s Pinterest-ing!
Follow me on Pinterest and pin this post to your Pinterest boards.
Subscribe to receive emails for my blog and newsletters about new patterns and project ideas.
Enjoy!
Joan
Joan’s Sewing Group | Pinterest
Like and share this post with your stitchy friends.


I managed to snag one of the bags of tie-dye Hershey kisses this summer and have been procrastinating making the bag (and maybe some foil wrappers) into this type of project. I’ve been afraid of ruining the bag but this tutorial may be just the confidence boost I needed!
I have just subscibed to your newsletter, I love lots of the items, I am wondering how I can print off the intstructions please.
Brenda