Embellish A Tote With Reverse Appliqué
Lazies, Diane Gilleland posted a very nice reverse-applique tutorial over at CraftStylish recently. Diane featured her appliqué on a tote and recommended that this technique would work well with my tote patterns, too. I have a few Lazy notes on how to incorporate Diane’s tutorial into our designs plus some additional thoughts as you plan your project.
New to our blog? Subscribe here.

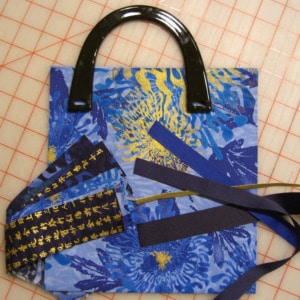
Diane’s reverse-appliqué tote.
Go read Diane’s reverse-applique tutorial then come back here and read on.
There’s more here than meets the eye to Diane’s project, so let’s take a look at why it shines so we can be as successful when we try it.
Fabric Choices
Look at the three fabrics Diane chose. A strong, vibrant, yet simple stripe fabric for the top layer. It’s not too busy, the print isn’t too small or too large. A small calico would fade away on this large of a piece. A print with a large floral would compete with the delicate appliqué design.

The second and third fabrics are plain. They allow the appliqué design to shine. Diane added a brown handle to coordinate with the brown fabric in the appliqué.
Order of the fabric layers
Look at the order of the layered fabrics. The second fabric is the lightest. Visually, it won’t bleed through and dampen the cover fabric like a dark fabric might. And it offers contrast between the dark brown fabric of the third, or bottom layer, and the green stripe fabric. It’s perfect. Test your layers to make sure they play well together.
Considerations for bag construction
Diane used three layers of cotton fabric together as the cover for this half of the bag. But what about the other side of the bag? You don’t need three layers, but you might want them.

Cute!
In all cases, make your reverse-appliqué first and treat it as one piece of fabric when constructing your project. Start with the size you need, or start bigger and trim when done.
Obviously, three layers of fabric is going to feel and behave differently than one layer of fabric. I recommend that when possible, treat the front and back of the bag the same when using this technique. You don’t have to do a reverse-appliqué on both sides, just ensure that the project has the same weight and feel on both sides.
To do so, use three layers of fabric for the back as well. For the bottom two layers that you won’t see, save a little money and use a less expensive muslin or hide an unwanted fabric if they are of similar feel, quality and weight.
Layer and test the fabrics to make sure they won’t show through to the top layer. In this case, a dark fabric for the second layer might tone down the top fabric and make the front and back of the bag look a little different.
Lazy Girl Designs bag recommendations
I think this technique and the resulting three layers of fabric for the cover of the project would work very well with the Whimsy Bag, Chloe Handbag, Veronica Pocketbook and Katy Bags. You can see all of our bag and tote patterns here.
In all cases, leave off any outside pockets or other embellishments. To make up for it, move the pockets inside when possible.
All of these bags have one piece of fabric that wraps from the front, across the bottom and up the back side. So, you can simply cut three layers big enough for the entire cover piece, do your applique for the front cover area, then complete the bag according to the pattern.
For Chloe and Katy, use the MasterPiece template in those patterns to plan the perfect placement of this appliqué embellishment.
Can you quilt it?
I wouldn’t recommend it. Keep this in mind as you choose batting and make sure the batting does not need to be quilted. Interfacing on the wrong side of the third fabric layer, the brown fabric in this case, might be a better choice.
Keep the bulk of your project in mind when choosing batting, too. This technique will add two layers of fabric to the seams. How many layers of fabric and batting will you need to sew through for this project?

Alterations
Consider trying this technique on a patch pocket to go on the outside of your bag. This would be perfect for the Towne Purse, Newport Tote, Chelsea Tote, or City Bag. Make a small reverse-appliqué, finish the edges and stitch in place as a patch pocket or surface embellishment.
Leave the edges unfinished and use it as a block design. Remember, there will be three layers of fabric for this block, your other blocks will probably be one layer. In this case, a small block design (4-6″) is probably safer than a large one (10-12″) for the sake of stability and strength for the length of the seams where pieced together.
Pieced covers
I think this would be cute as can be on a Miranda Day Bag. The cover of Miranda is made up of quilted squares that are then stitched together. In this case, make your reverse-appliqué then fuse the blocks to a fusible batting such as Pellon’s fusible fleece. Then construct the bag according to the pattern.
For Gracie, I’d love to see this technique on the outer two panels. Or the center panel and skip the flap closure. Either way, use three layers of fabric for each of the three panels for consistency.
Enjoy!
Joan
Photos courtesy of Diane Gilleland.


Fabulous! Love the color choices. Great idea for all the bags you mentioned. I have used reverse applique with several quilt blocks but have not done anything larger than 6 inches so this could be a great project for a summer fun bag from from the Lazy Girl Collection!
Penny D in Chesapeake
Pingback: CraftyPod » Blog Archive » Monday Mix
I really like your purse, it’s a wonderful idea to combine the colors with a nice design. congratulations!
Hi – I loved your lazy girl bags, especially the one which can be used as a briefcase and one with the reverse applique.
lovely bag
Pingback: Indie Fixx / molas + reverse applique
Pingback: Crafty Manolo » Inspiration Gallery: Reverse Applique